Why we Need to Display ?
There are some projects where we need to display instant result on Arduino Board . For Example Room Temperature,Fingerprint Attendance ,Games , Locking System,Ultrasound Sensor Distance,Voltage & Ampere,Digital Clock.
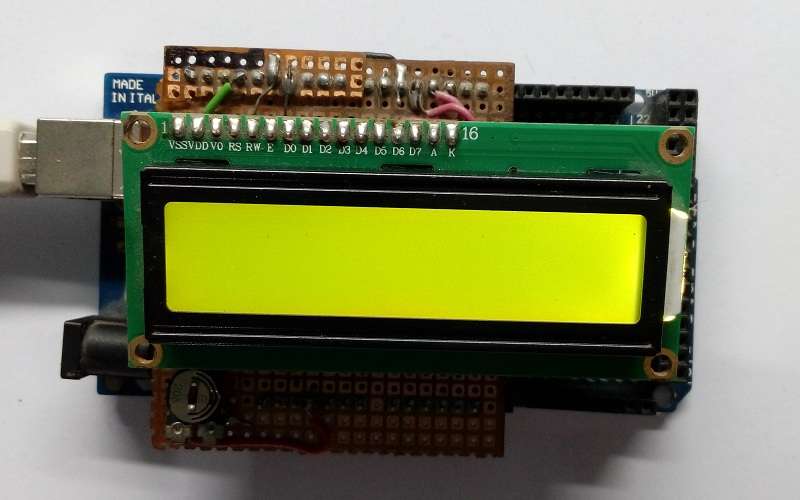
How To Connect Display with Arduino ?
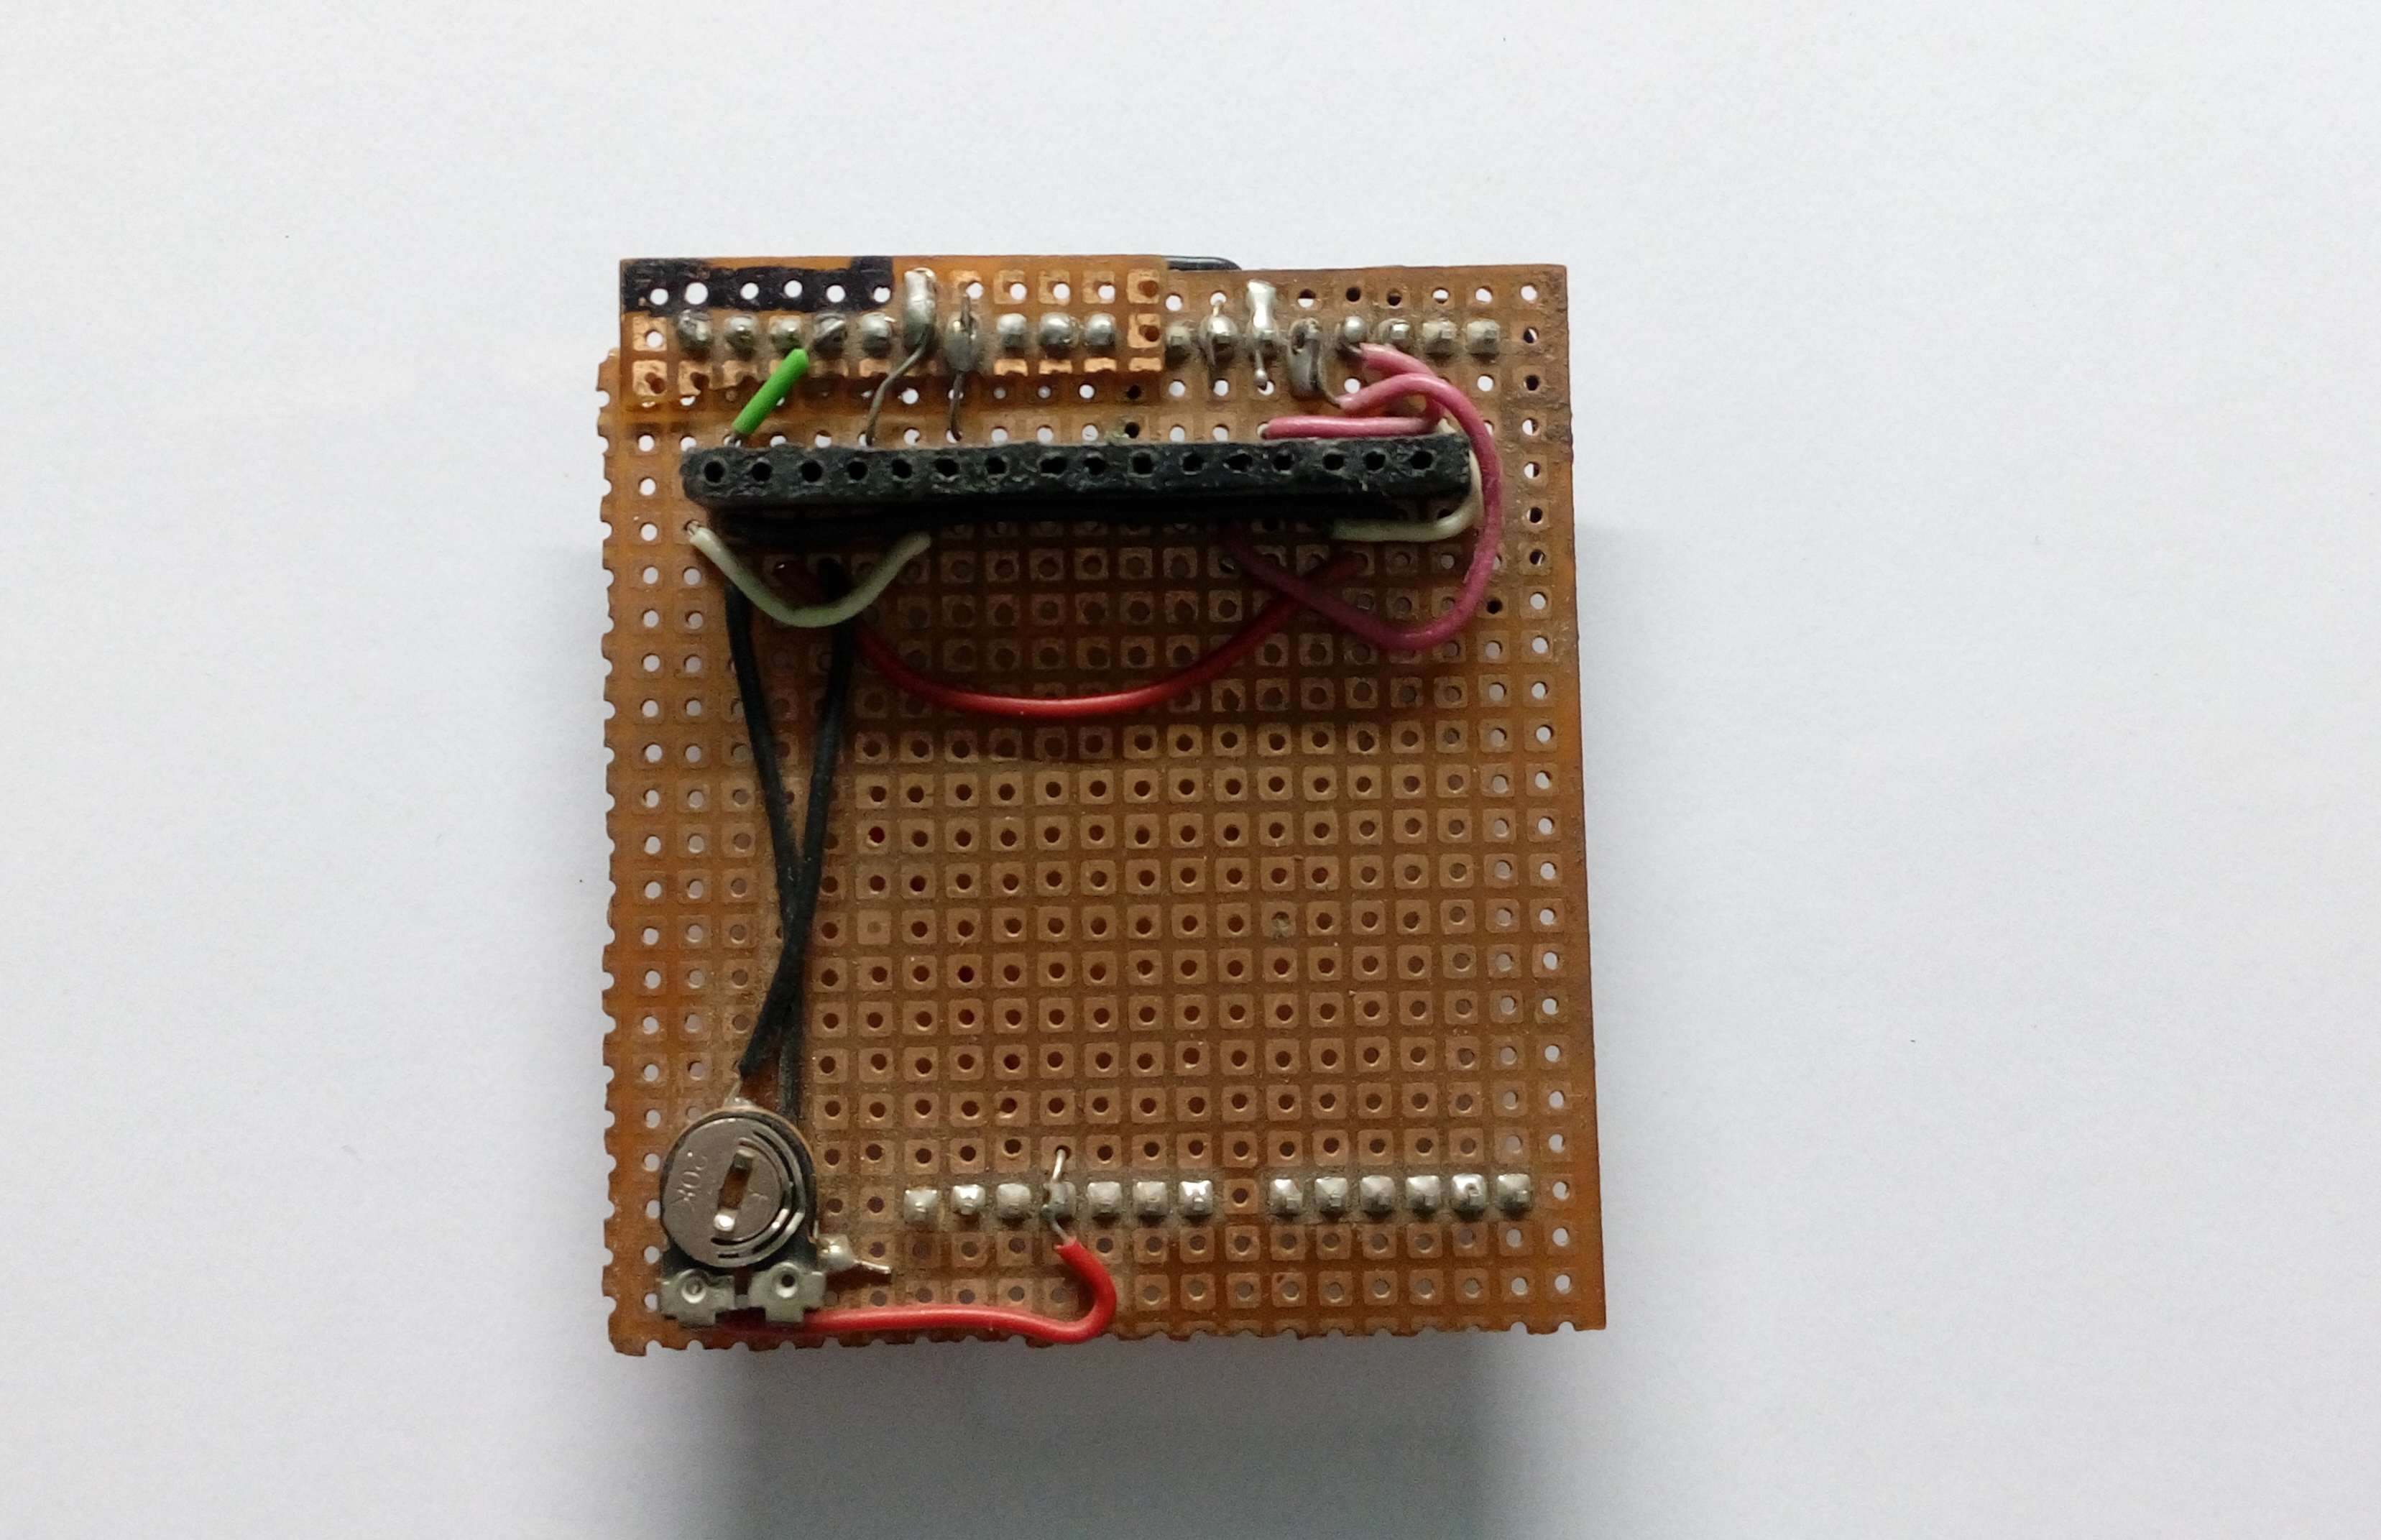
Requirement
- Arduino Uno / Mega.
- LCD 16×2 .
- Wires.
- Male pin header / Female pin header.
- Potentiometer 10k.
- PCB to make custom shield for further use.
These Things Are Available At Amazon if Not available in Local Stores.
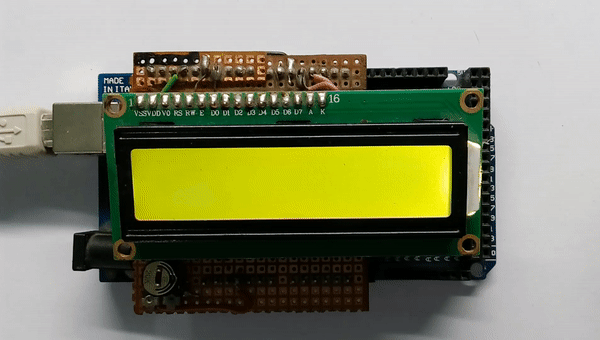
Schematic

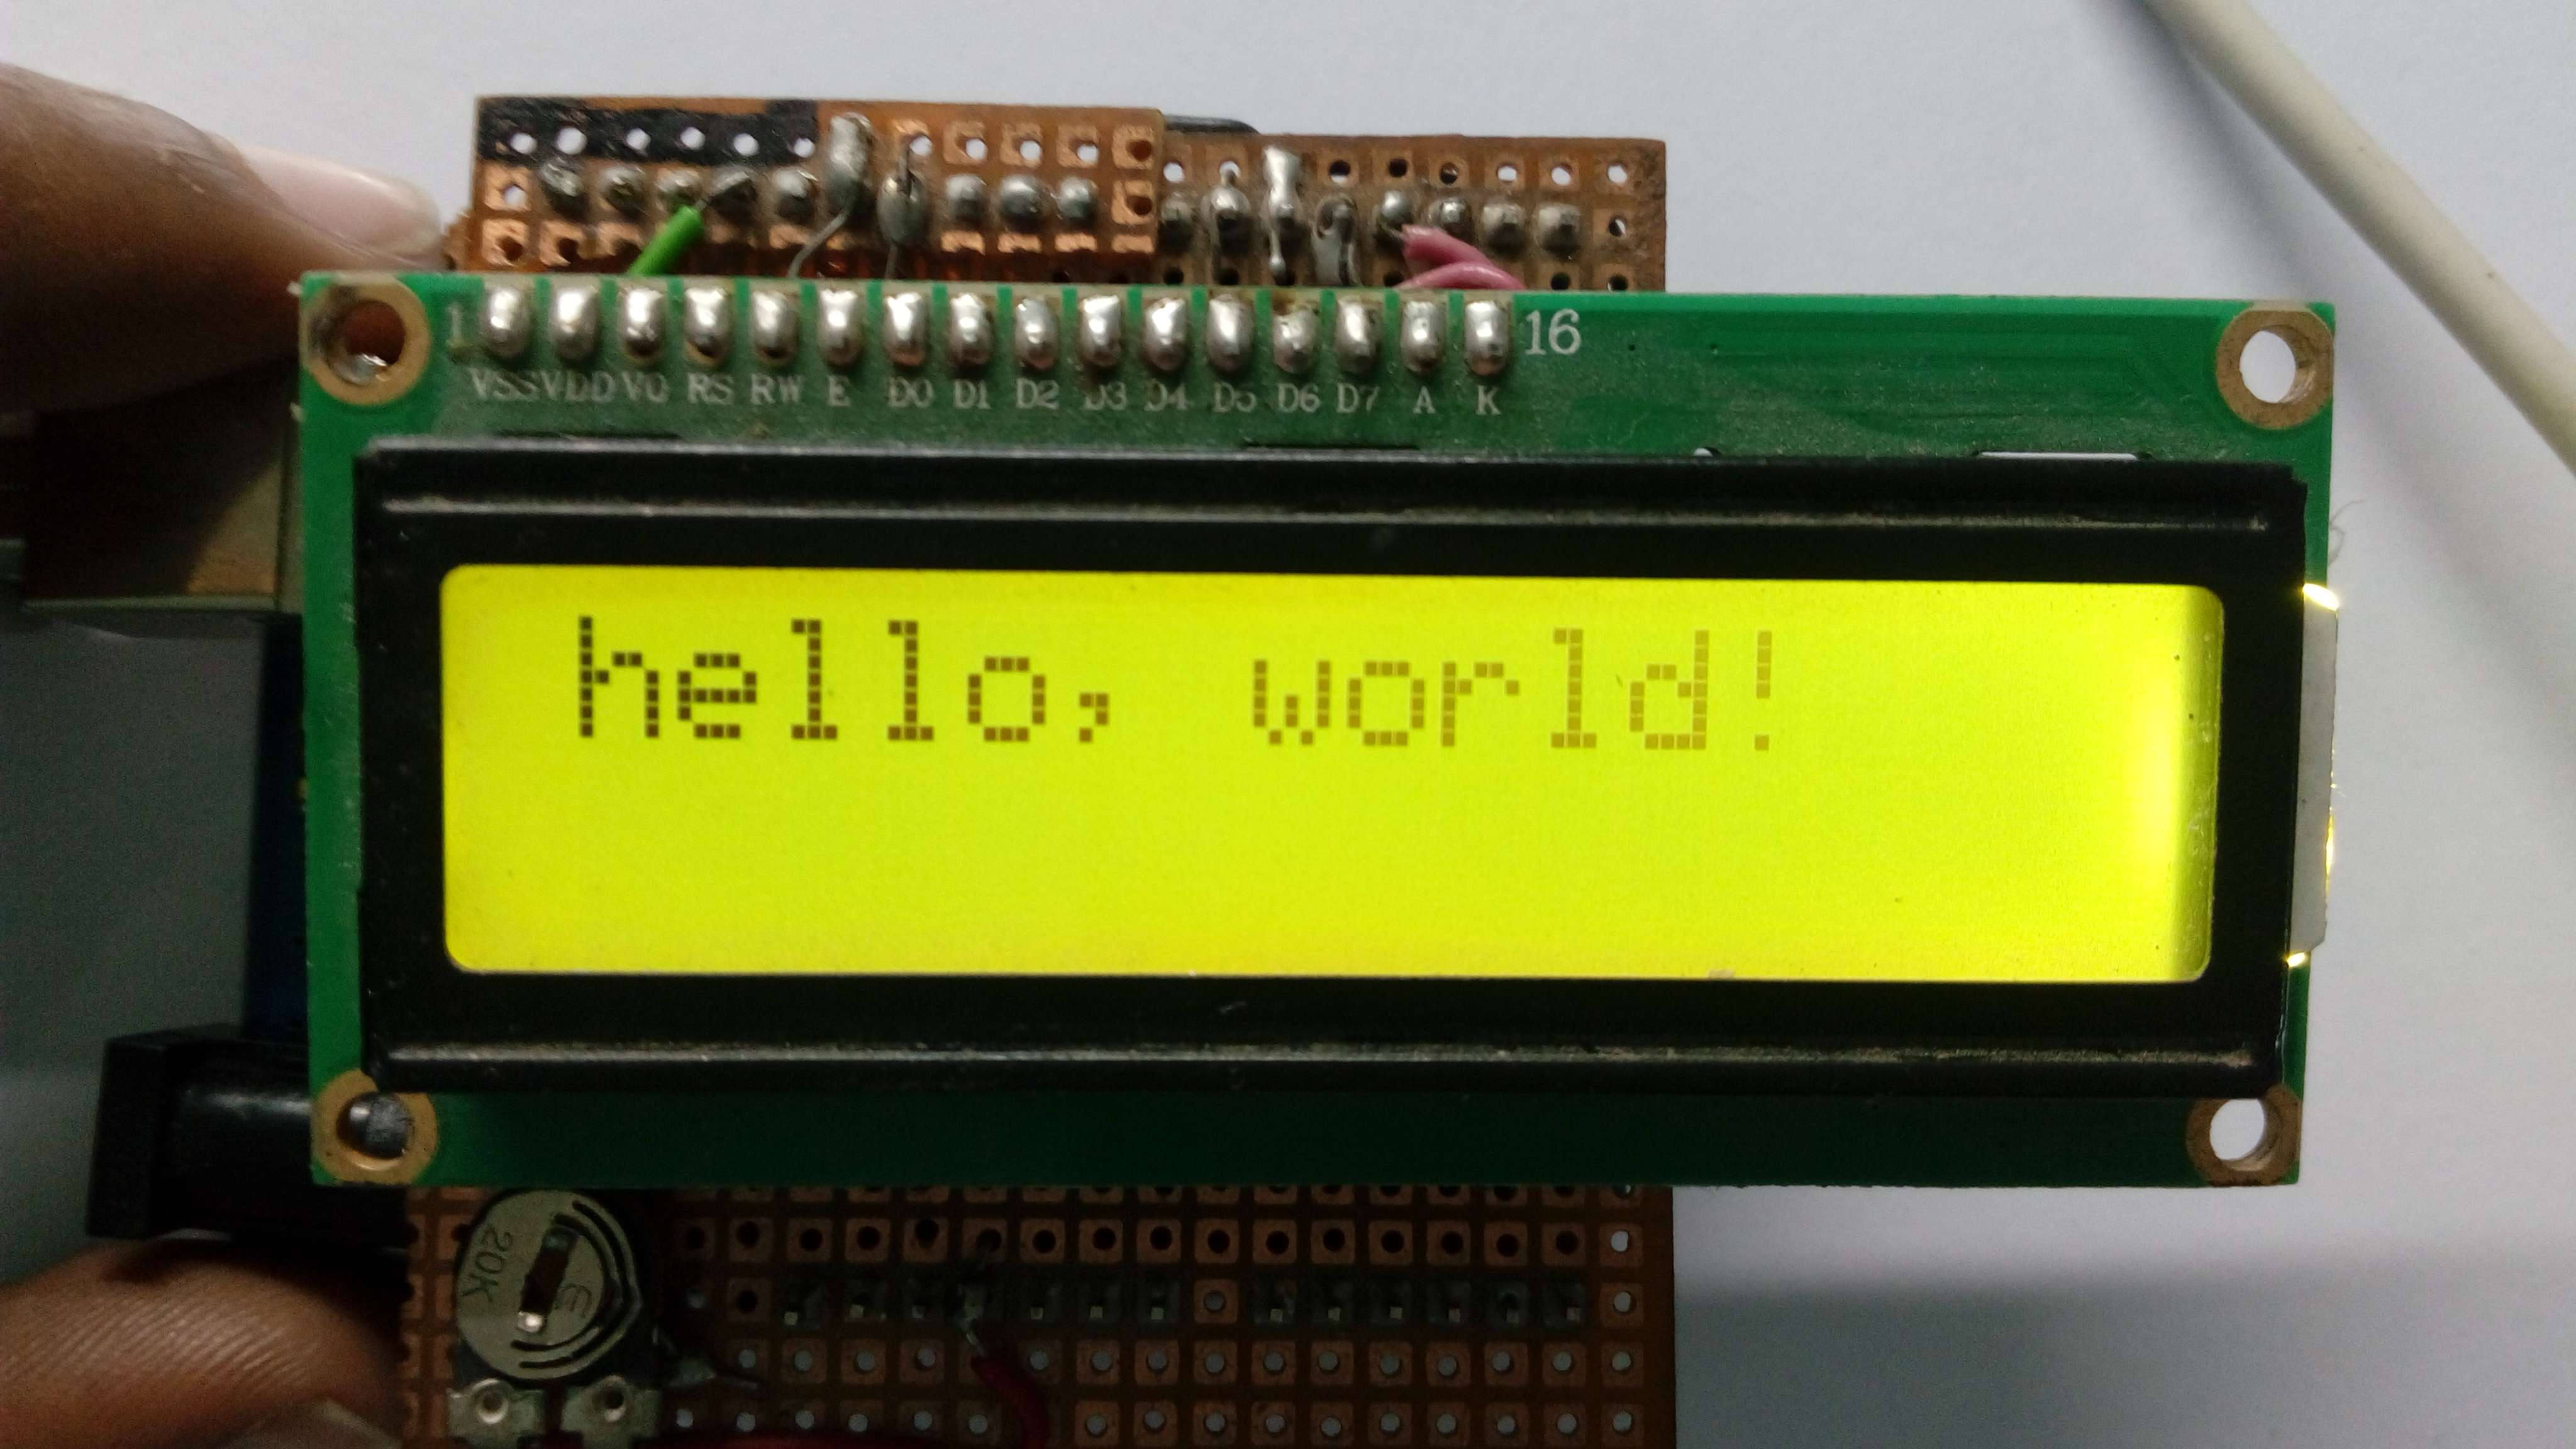
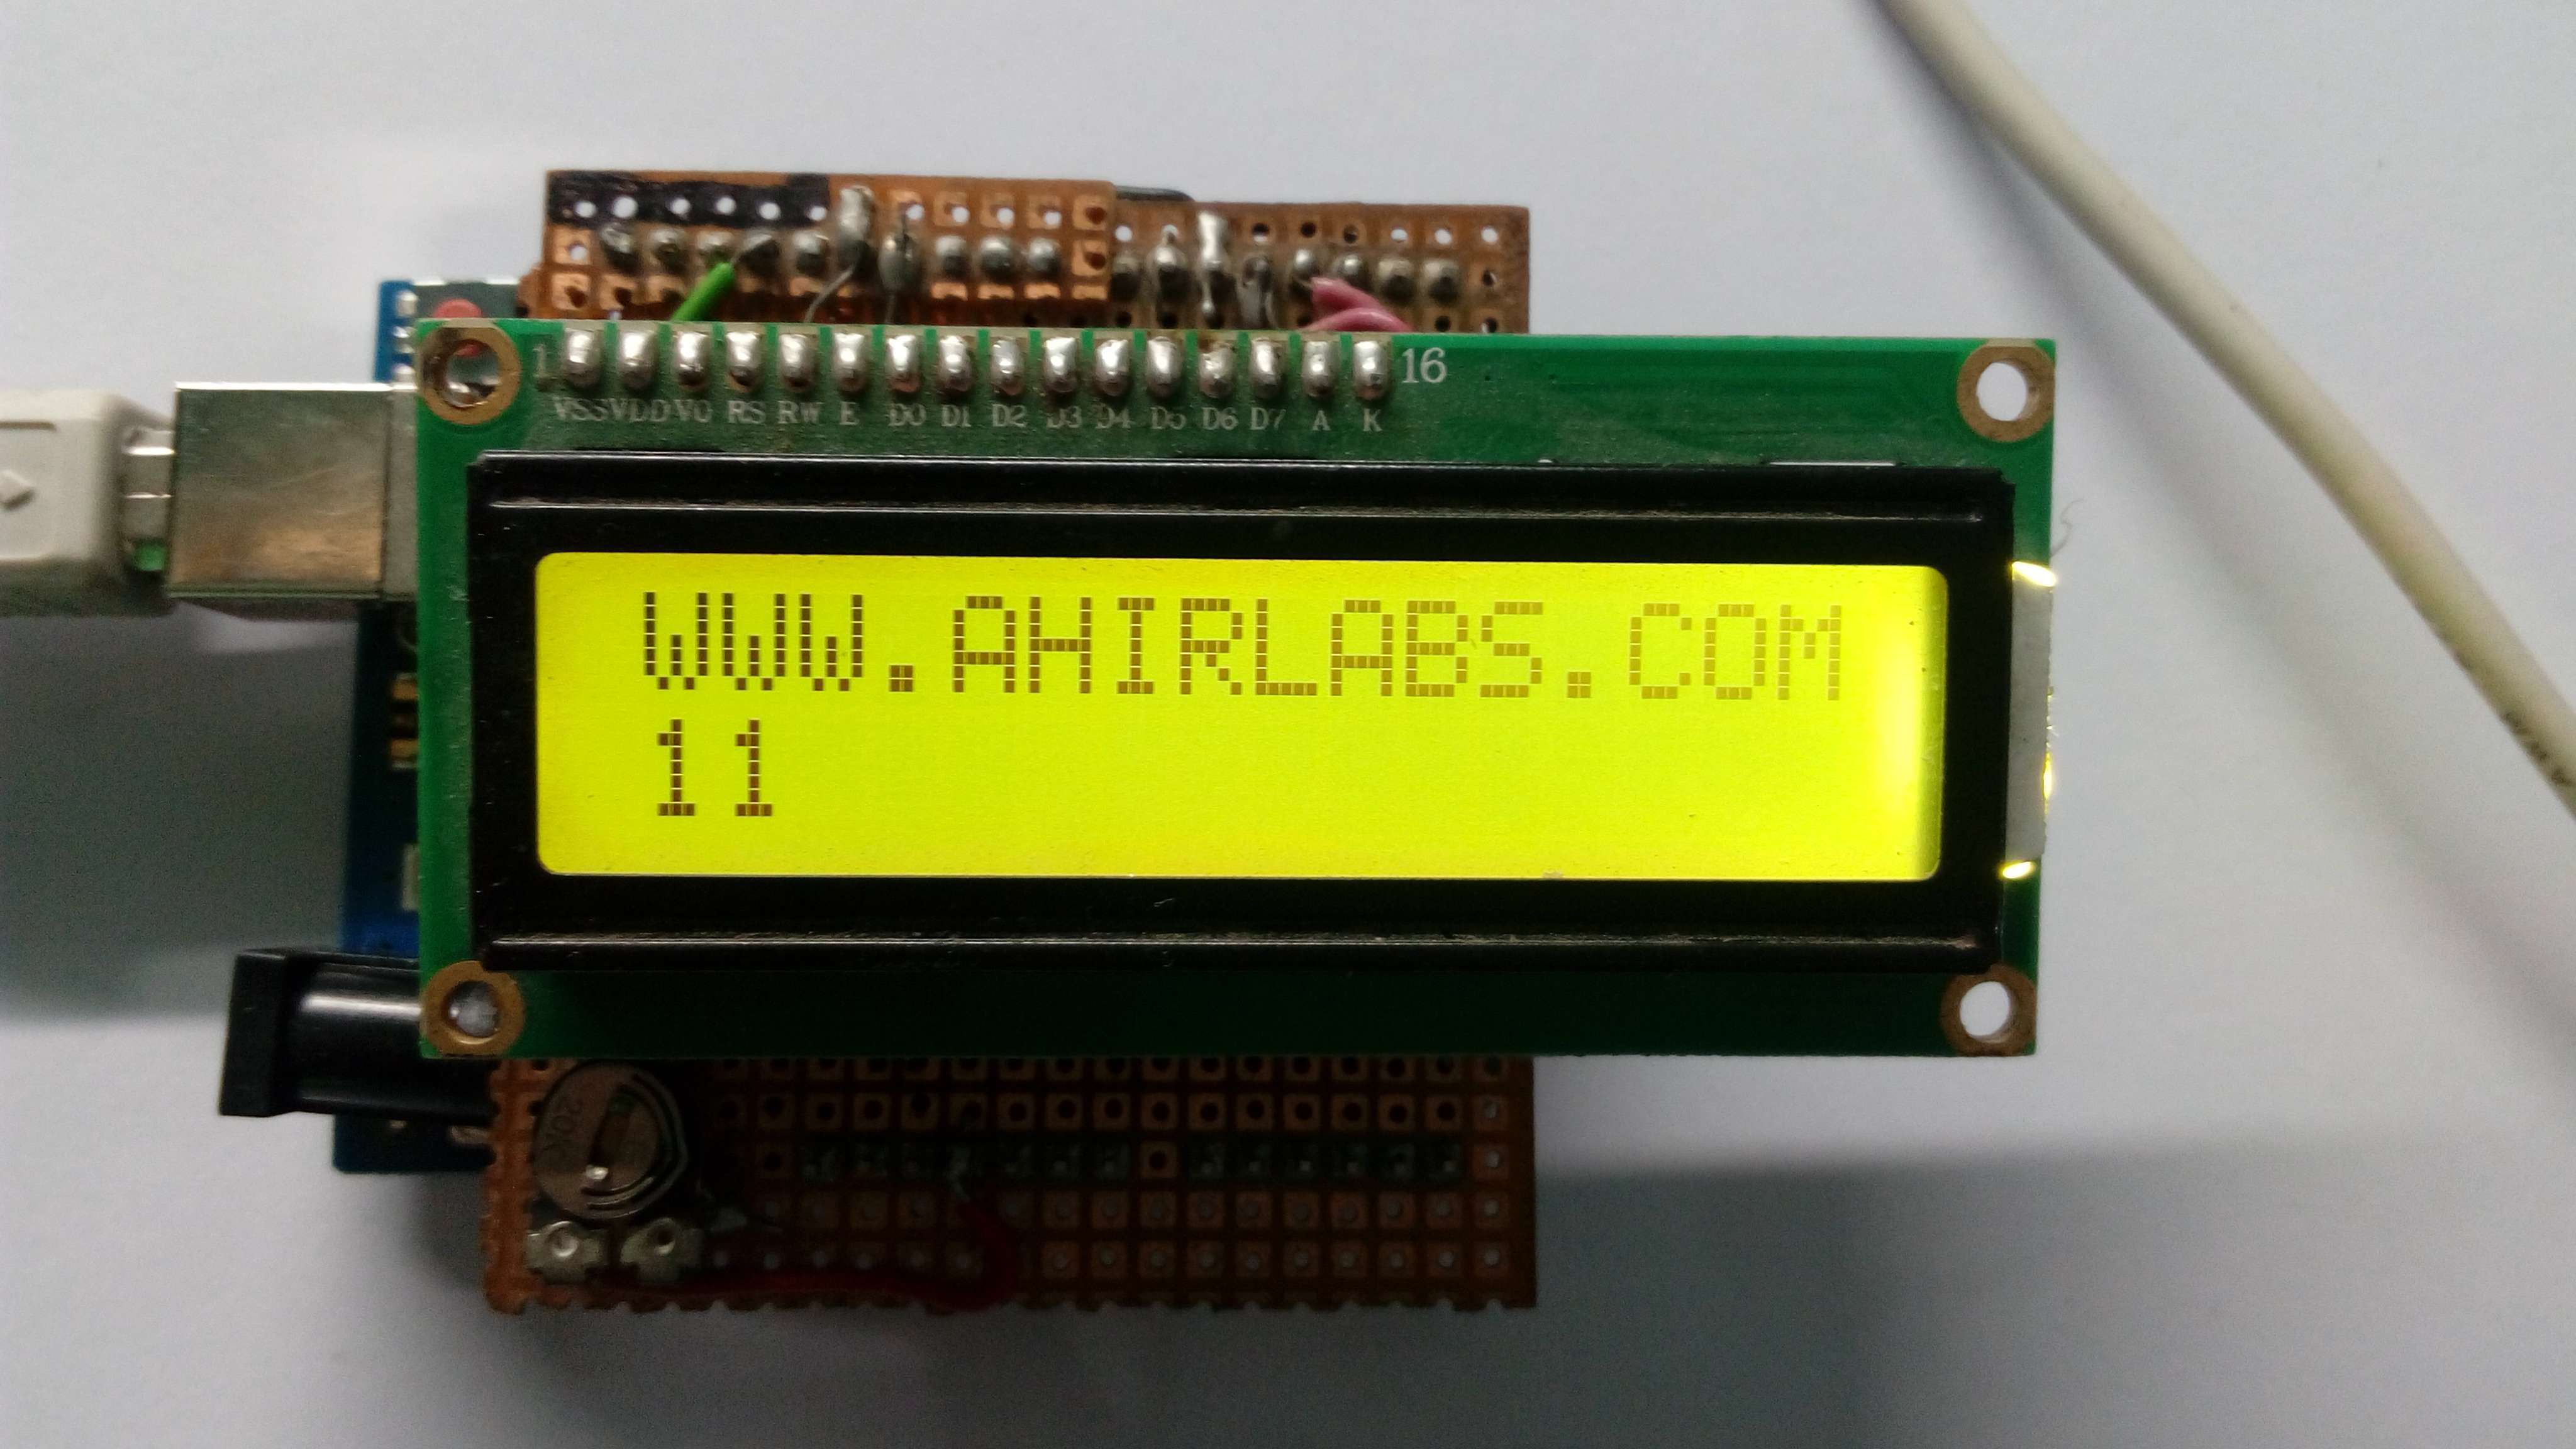
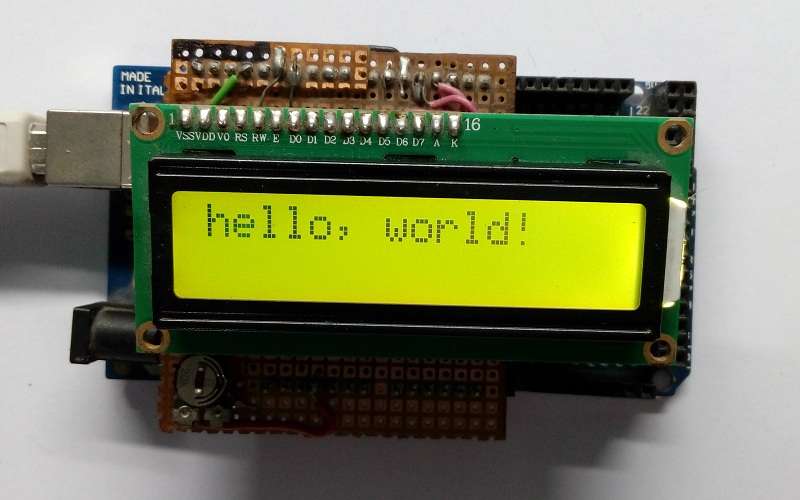
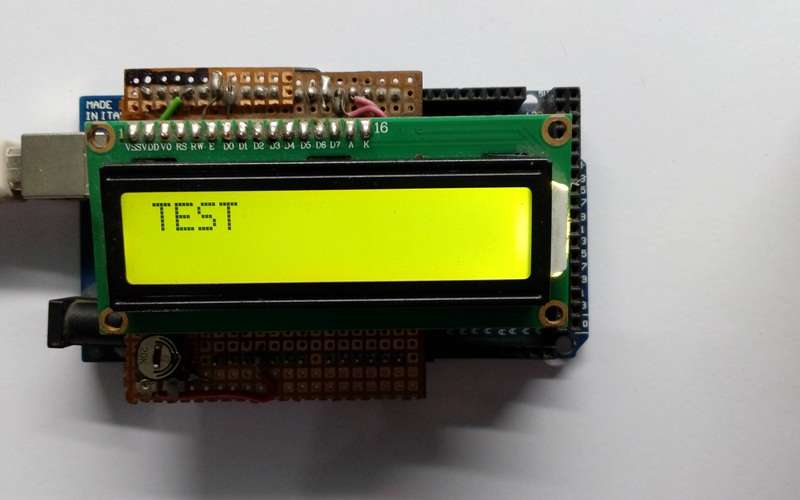
Result
Program
Its is also available in Arduino in Example-> LiquidCrystal -> Hello World .
Here are Some Changes so you Understand Better.
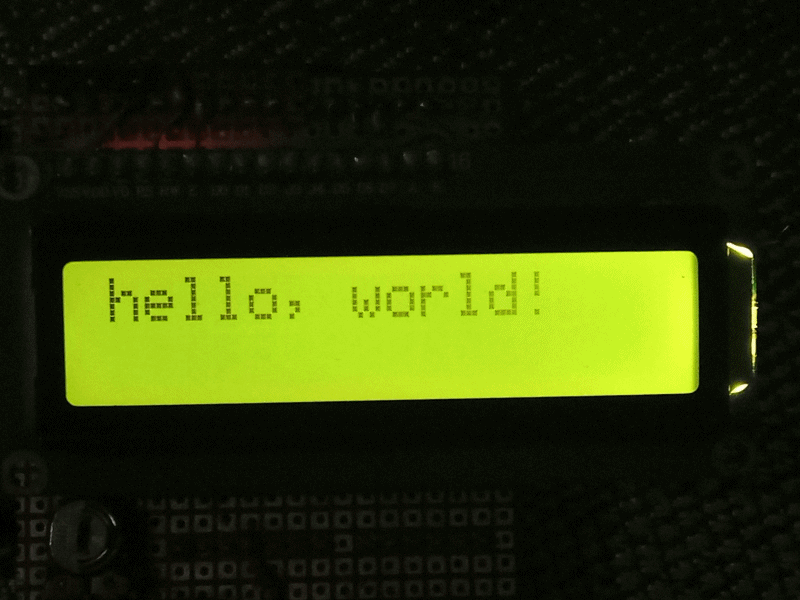
#include <LiquidCrystal.h>
//DEFINE According to Need
#define RS 12
#define EN 11
#define D4 5
#define D5 4
#define D6 3
#define D7 2
//lcd is define namelcd(RS pin, EN pin, D4 pin, D5 pin, D6 pin, D7 pin)
LiquidCrystal lcd(RS, EN, D4, D5, D6, D7);
void setup() {
lcd.begin(16, 2);//Define What size of Lcd
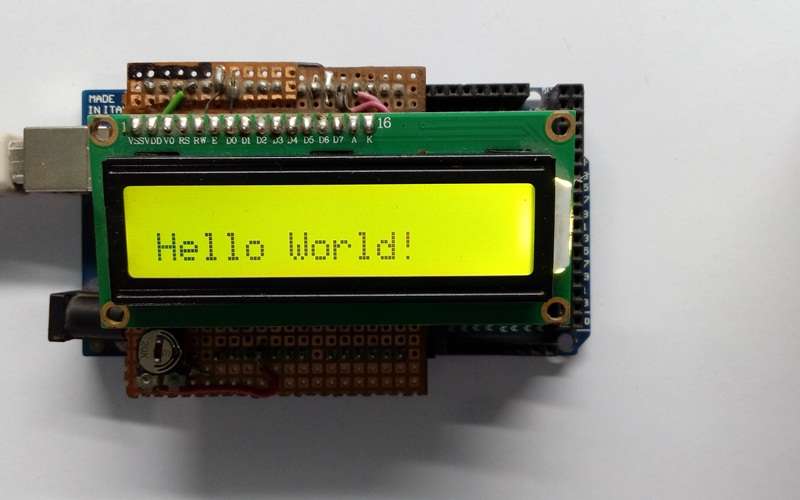
lcd.print("hello, world!"); // Print or display on screen
delay(3000);//Diplay Upto 3sec
}
void loop() {
lcd.clear(); //It Set to clear all content on display.
lcd.print("WWW.AHIRLABS.COM"); // Print or display on screen 16Char
lcd.setCursor(0, 1); // Define Position
lcd.print(millis() / 1000);
delay(1000);//set delay according to need | avoid multiple delay while used lcd.
}
OUTPUT
LiquidCrystal Library Functions
1. Begin
#include <LiquidCrystal.h>
	//DEFINE According to Need
	#define RS 12
	#define EN 11
	#define D4 5
	#define D5 4
	#define D6 3
	#define D7 2
	//lcd is define namelcd(RS pin, EN pin, D4 pin, D5 pin, D6 pin, D7 pin)
	LiquidCrystal lcd(RS, EN, D4, D5, D6, D7);
	void setup() {
	  lcd.begin(16, 2);//Define What size of Lcd
	  lcd.print("hello, world!"); // Print or display on screen
	}
	void loop() {
	}
2. Clear
void loop(){
lcd.clear(); // Define after loop start.
/*
Rest of Code
*/
}
3. Print
// Method 1
lcd.print("TEST");
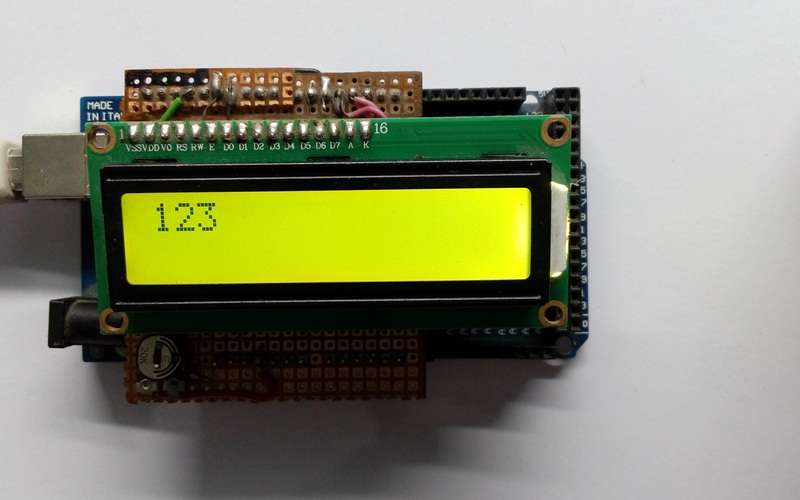
// Method 2
lcd.print(variable);
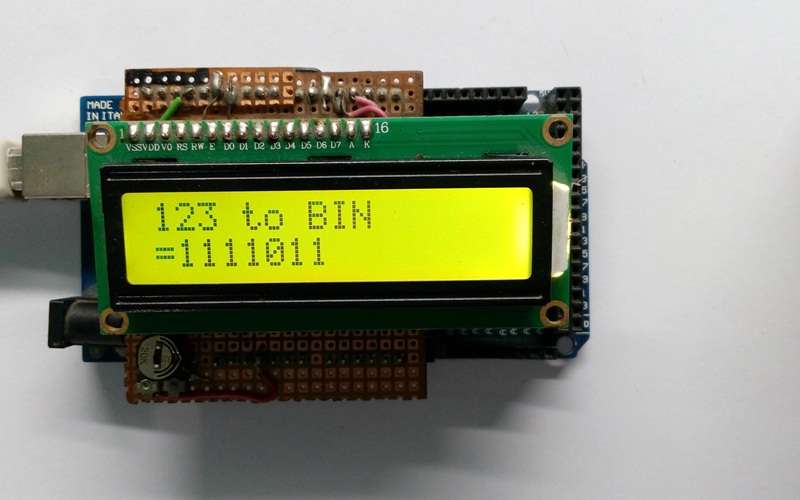
// Method 3
lcd.print(variable,type)
lcd.print(variable,HEX); //Hexadecimal
lcd.print(variable,DEC); //Decimal
lcd.print(variable,OCT); //Octal
lcd.print(variable,BIN); //Binary
// Method 4
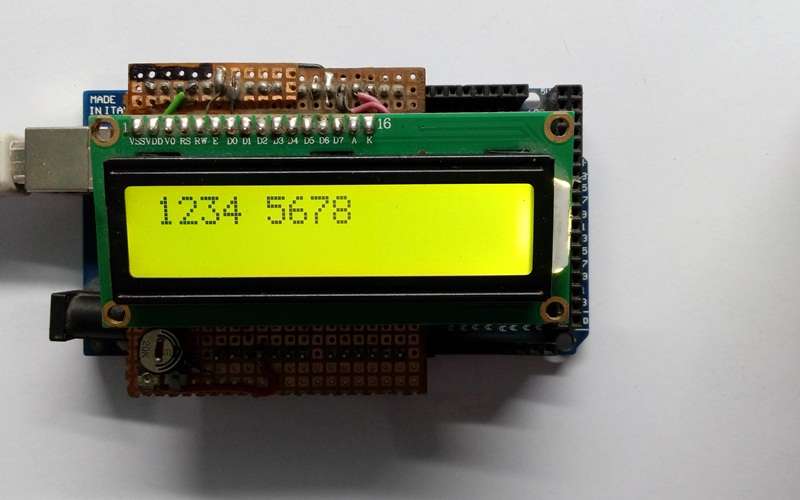
int number = 5678;
lcd.print(String("1234 ") + String(number));
// Method 5
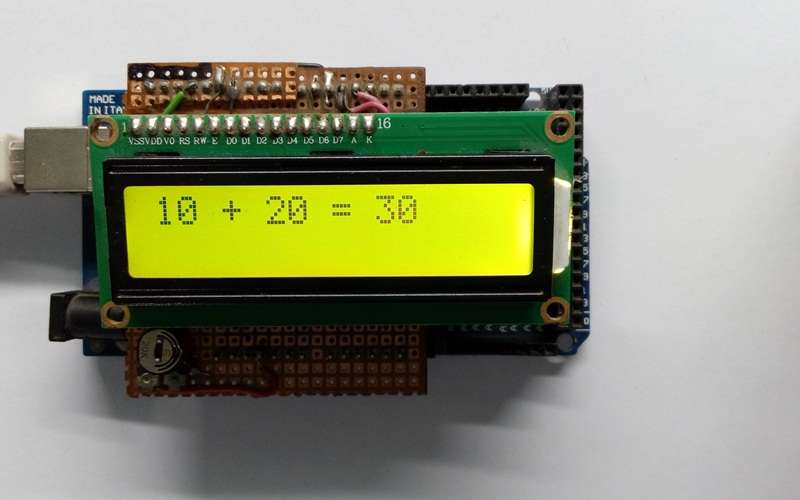
int A = 10;
int B = 20;
int C = A + B;
lcd.print(String(A) + String(" + ") + String(B) + String(" = ") + String(C));
// Method 6
lcd.print(A);
lcd.print(" + ");
lcd.print(B);
lcd.print(" = ");
lcd.print(C);
Method 1
Method 2
Method 3


Method 4
Method 5

Method 6
4. Write
#include <LiquidCrystal.h>
//DEFINE According to Need
#define RS 12
#define EN 11
#define D4 5
#define D5 4
#define D6 3
#define D7 2
//lcd is define namelcd(RS pin, EN pin, D4 pin, D5 pin, D6 pin, D7 pin)
LiquidCrystal lcd(RS, EN, D4, D5, D6, D7);

void setup() {
  lcd.begin(16, 2);//Define What size of Lcd
 }
void loop() {
  int var=100;
  lcd.clear(); //It Set to clear all content on display.
  lcd.setCursor(0, 1); // Define Position
  lcd.write("Hello World!"); //Same as Print But basic Use To Print Character
  delay(1000);//set delay according to need | avoid multiple delay while used lcd.
}
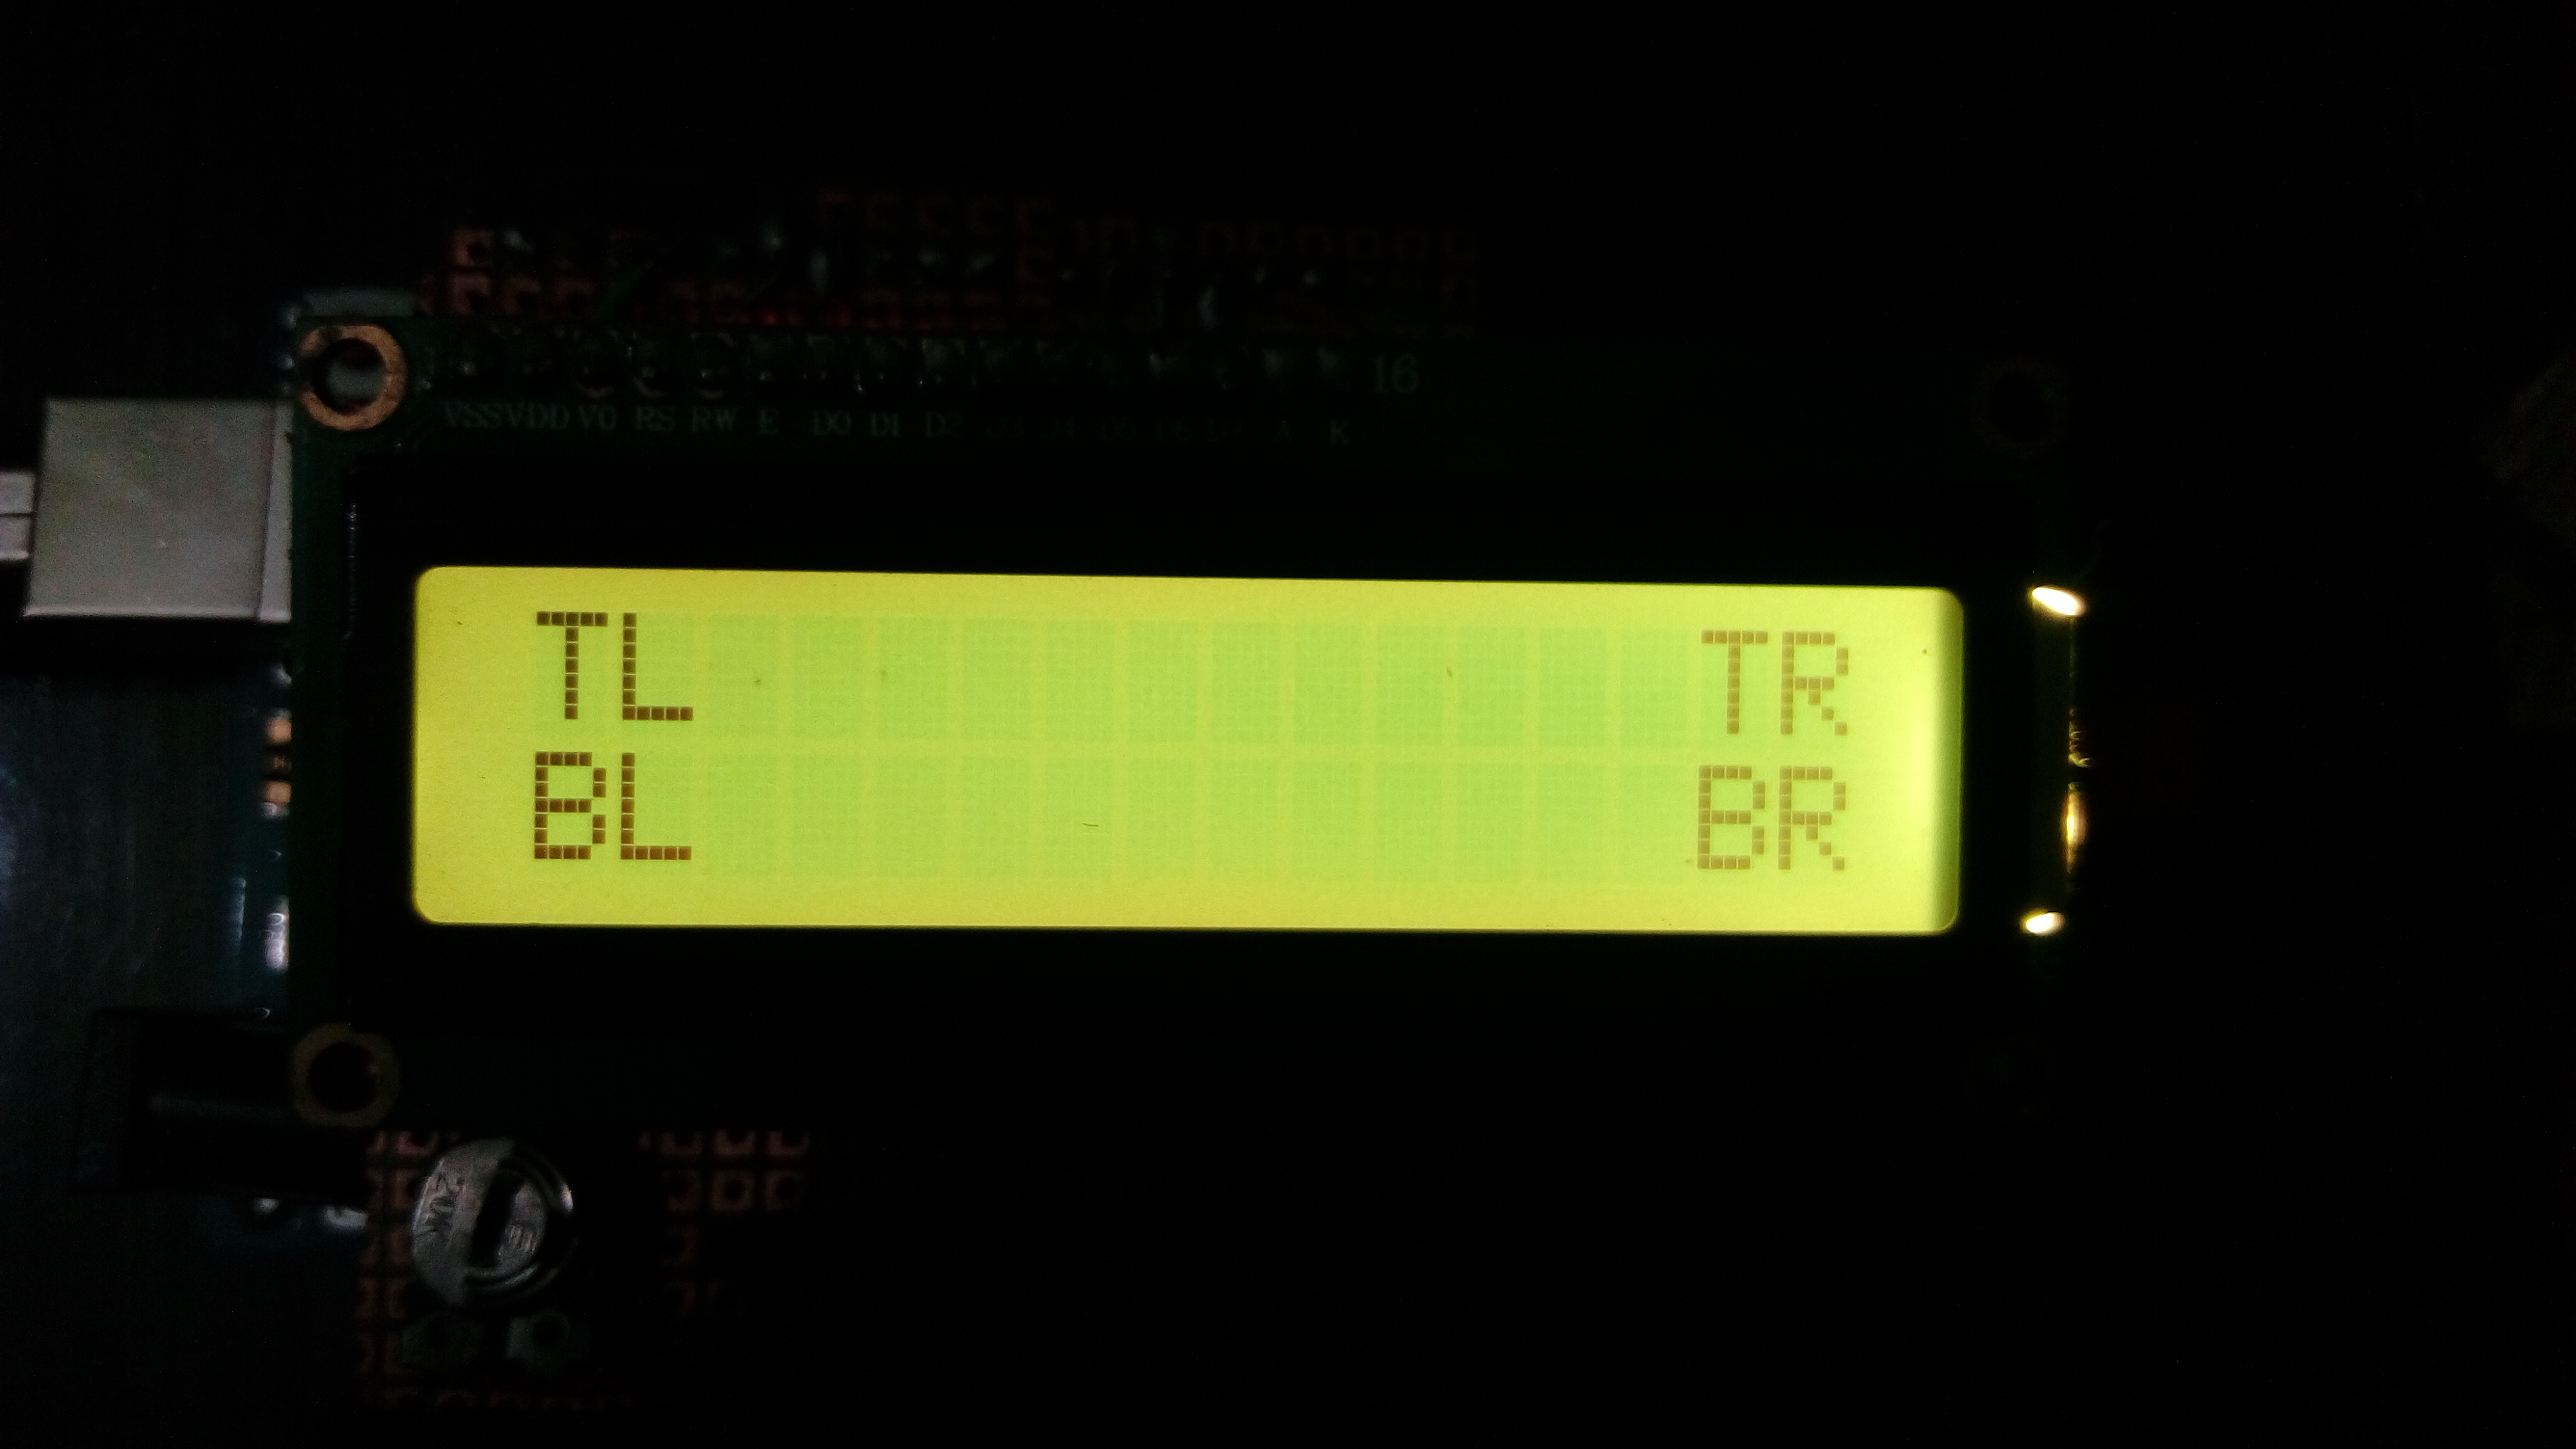
5. Set Cursor
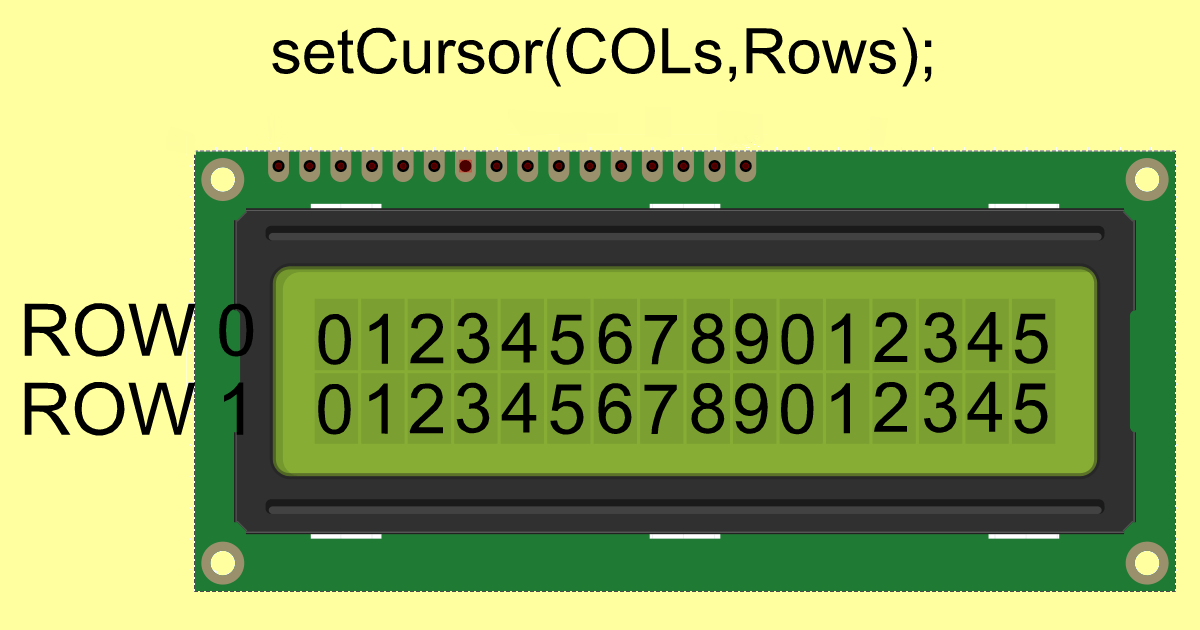
	lcd.setCursor(COLs, ROWs);
	lcd.setCursor(0, 0); // top left
	lcd.setCursor(15, 0); // top right
	lcd.setCursor(0, 1); // bottom left
	lcd.setCursor(15, 1); // bottom right
#include <LiquidCrystal.h>
  //DEFINE According to Need
  #define RS 12
  #define EN 11
  #define D4 5
  #define D5 4
  #define D6 3
  #define D7 2
  //lcd is define namelcd(RS pin, EN pin, D4 pin, D5 pin, D6 pin, D7 pin)
  LiquidCrystal lcd(RS, EN, D4, D5, D6, D7);

  void setup() {
    lcd.begin(16, 2);//Define What size of Lcd
  }
  void loop() {
    lcd.clear();
    lcd.setCursor(0, 0); // top left
    lcd.print("TL");
    lcd.setCursor(14, 0); // top right
    lcd.print("TR");
    lcd.setCursor(0, 1); // bottom left
    lcd.print("BL");
    lcd.setCursor(14, 1); // bottom right
    lcd.print("BR");
    delay(1000);
  }
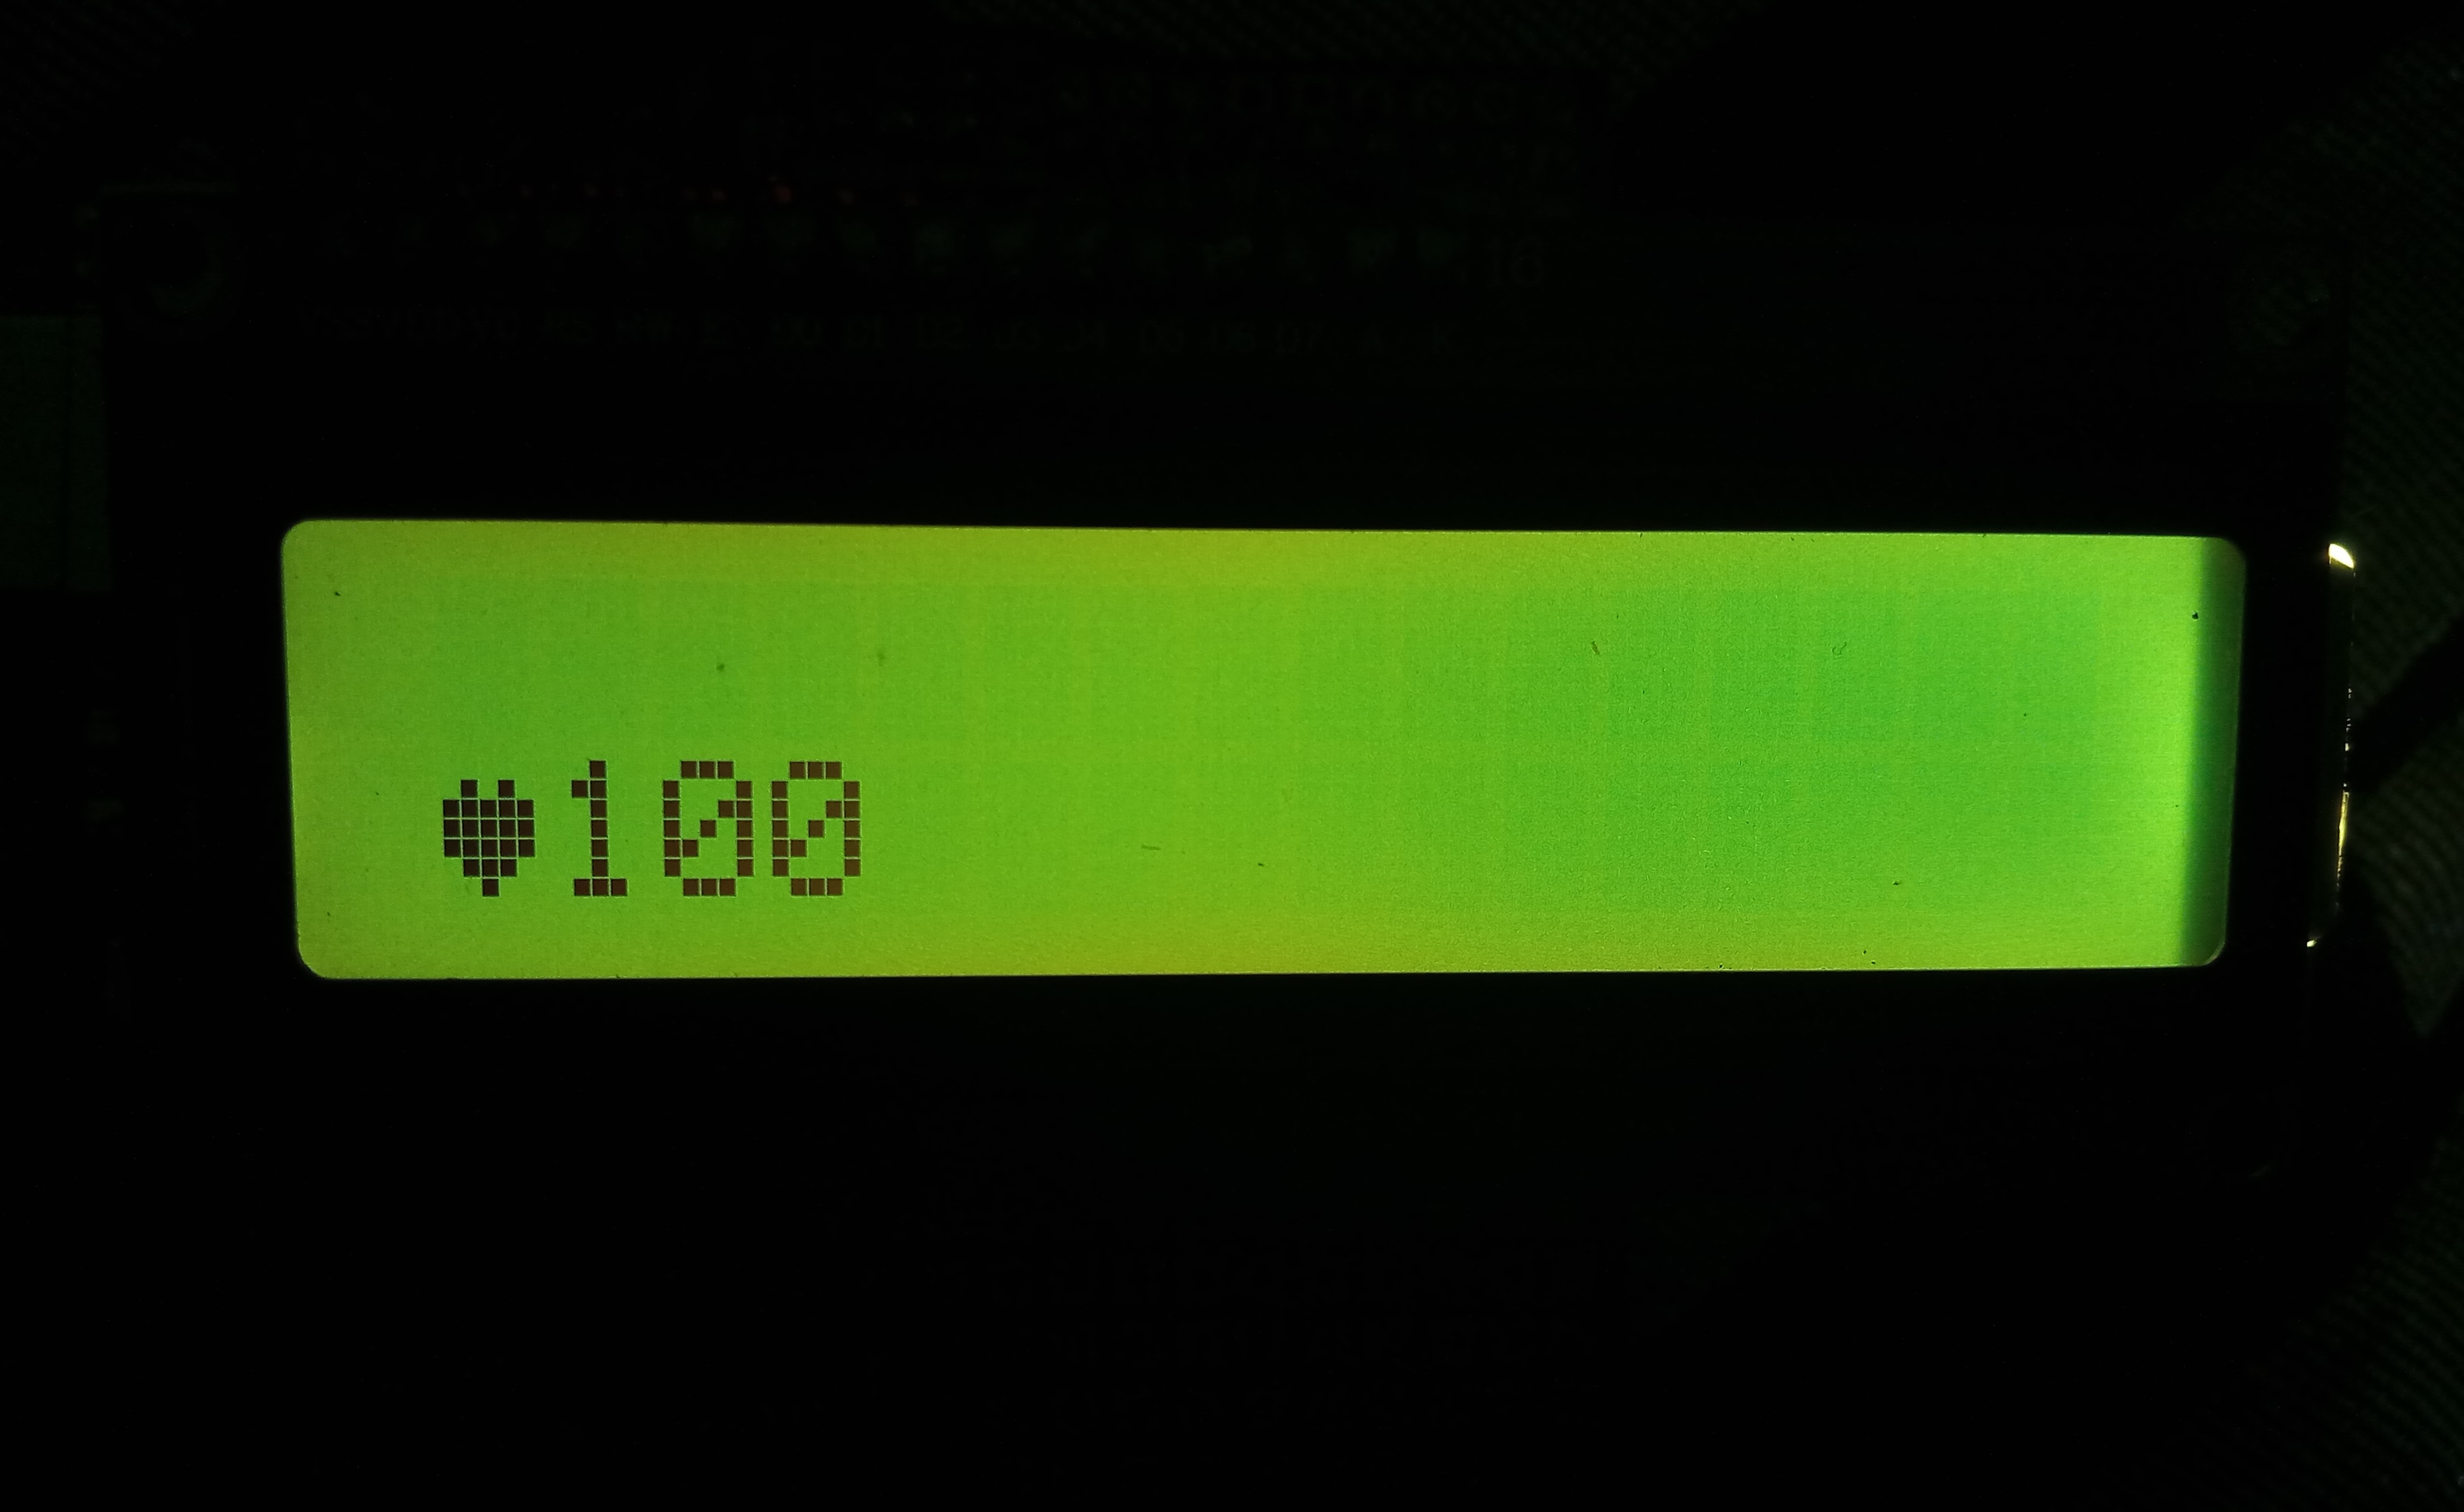
6. Create Char
#include <LiquidCrystal.h>
	//DEFINE According to Need
	#define RS 12
	#define EN 11
	#define D4 5
	#define D5 4
	#define D6 3
	#define D7 2
	//lcd is define namelcd(RS pin, EN pin, D4 pin, D5 pin, D6 pin, D7 pin)
	LiquidCrystal lcd(RS, EN, D4, D5, D6, D7);
	byte heart[8] = {
	  B00000,
	  B01010,
	  B11111,
	  B11111,
	  B11111,
	  B01110,
	  B00100,
	  B00000
	};

	void setup() {
	  lcd.begin(16, 2);//Define What size of Lcd
	  lcd.createChar(0, heart);
	}
	void loop() {
	  int var=100;
	  lcd.clear(); //It Set to clear all content on display.
	  lcd.setCursor(0, 1); // Define Position
	  lcd.write(byte(heart));
	  lcd.print(var); // Print or display on screen
	  delay(1000);//set delay according to need | avoid multiple delay while used lcd.
	}
7. Cursor
It Control the underscore-style cursor in Define Location
	#include <LiquidCrystal.h>
	//DEFINE According to Need
	#define RS 12
	#define EN 11
	#define D4 5
	#define D5 4
	#define D6 3
	#define D7 2
	//lcd is define namelcd(RS pin, EN pin, D4 pin, D5 pin, D6 pin, D7 pin)
	LiquidCrystal lcd(RS, EN, D4, D5, D6, D7);

	void setup() {
	  lcd.begin(16, 2);//Define What size of Lcd
	  lcd.print("hello, world!");
	}
	void loop() {
	  lcd.noCursor();
	  delay(500);
	  // Turn on the cursor:
	  lcd.cursor();
	  delay(500);
	}
8. Scroll
Scroll text left and right.
  #include <LiquidCrystal.h>
  //DEFINE According to Need
  #define RS 12
  #define EN 11
  #define D4 5
  #define D5 4
  #define D6 3
  #define D7 2
  //lcd is define namelcd(RS pin, EN pin, D4 pin, D5 pin, D6 pin, D7 pin)
  LiquidCrystal lcd(RS, EN, D4, D5, D6, D7);

void setup() {
  // set up the LCD's number of columns and rows:
  lcd.begin(16, 2);
  // Print a message to the LCD.
  lcd.print("hello, world!");
  delay(1000);
}

void loop() {
    // scroll one position right:
    lcd.scrollDisplayLeft(); // Its Allow Flow Moving to left but Text is Going Right side
    // wait a bit:
    delay(500);
}
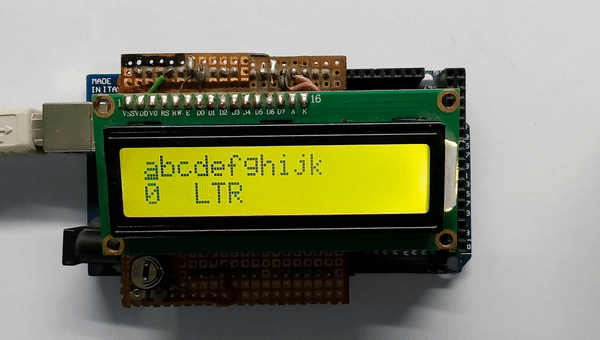
9. Text-Direction
Control which way text flows from the cursor.
#include <LiquidCrystal.h>
  //DEFINE According to Need
  #define RS 12
  #define EN 11
  #define D4 5
  #define D5 4
  #define D6 3
  #define D7 2
  //lcd is define namelcd(RS pin, EN pin, D4 pin, D5 pin, D6 pin, D7 pin)
  LiquidCrystal lcd(RS, EN, D4, D5, D6, D7);

  //Movement Variable
  bool movetoright=true;
  char alphabet[20] = {"abcdefghijk"};
void setup() {
  // set up the LCD's number of columns and rows:
  lcd.begin(16, 2);
  // turn on the cursor:
  lcd.cursor();
}
void loop() {
  if(movetoright){
    for(int i=0;i<11;i++){
      lcd.clear();
      lcd.write(alphabet);
      lcd.setCursor(0,1);
      lcd.print(i);
      lcd.setCursor(3,1);
      lcd.print("LTR");
      lcd.leftToRight();
      lcd.setCursor(i,0);
      delay(1000);
    }
    movetoright = false;
  }else{
    for(int i=10;i>-1;i--){
      lcd.clear();
      lcd.write(alphabet);
      lcd.setCursor(0,1);
      lcd.print(i);
      lcd.setCursor(3,1);
      lcd.print("RTL");
      lcd.rightToLeft();
      lcd.setCursor(i,0);
      delay(1000);
    }
    movetoright = true;
  }
  delay(1000);
}
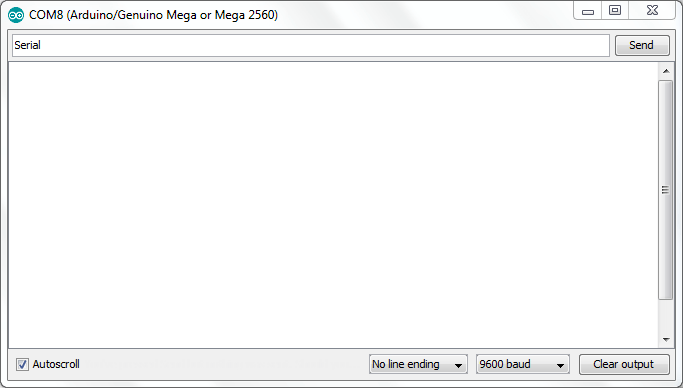
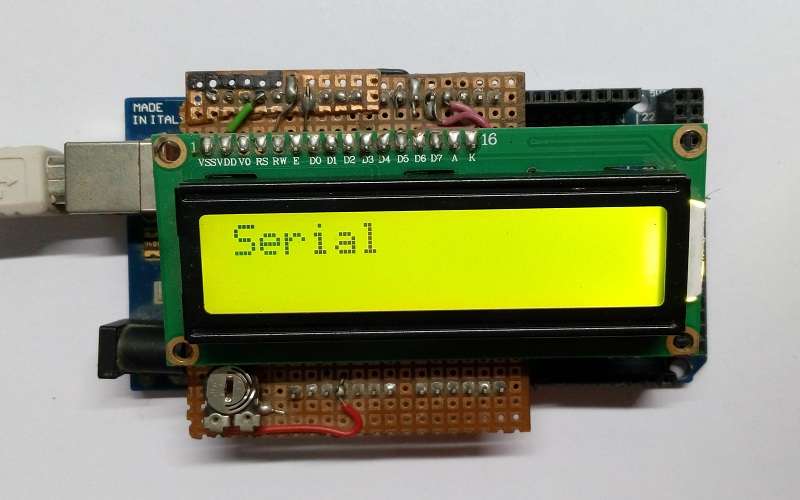
10. Serial-Display
It Accepts serial input Store in Buffer And then displays it.it clear After Reset.
Need Serial Monitor To Send data Set Baud Rate.
In Arduino IDE : Examples -> LiquidCrystal -> SerialDisplay
    #include <LiquidCrystal.h>
    //DEFINE According to Need
    #define RS 12
    #define EN 11
    #define D4 5
    #define D5 4
    #define D6 3
    #define D7 2
    //lcd is define namelcd(RS pin, EN pin, D4 pin, D5 pin, D6 pin, D7 pin)
    LiquidCrystal lcd(RS, EN, D4, D5, D6, D7);
void setup() {
  // set up the LCD's number of columns and rows:
  lcd.begin(16, 2);
  // initialize the serial communications:
  Serial.begin(9600);
}

void loop() {
  // when characters arrive over the serial port...
  if (Serial.available()) {
    // wait a bit for the entire message to arrive
    delay(100);
    // clear the screen
    lcd.clear();
    // read all the available characters
    while (Serial.available() > 0) {
      // display each character to the LCD
      lcd.write(Serial.read());
    }
  }
}
I like the article