Whats is Home Automation ?
An Device which can Controlled Electrical Appliance Like TV,Light Bulb , Water Pump Etc. by Remotely and Monitor local or Widely by An App or Web-link.
Where is Purpose to use NodeMCU Esp8266 ?
1. Node MCU is Based on ESP8266 which is a WiFi which we programmed by arduino IDE and adjust According to need.
2. Less Power Consumption
3. No of Pins is less but it Extends with I2c Interface.
List of Requirement to Convert NodeMCU ESP8266 to Home Automation ?
- User Interface ( Web Based, Android App Based)
- Data Storage (Database).
- Programming (Fetch Data From Database)
- Hardware Part (PCB ,Relay Circuit, Power Supply).
1. User Interface
Any IOT Device Need an Interface to Trigger Light Bulb ON or OFF. This Interface is connected to Database which update the value. when button is Press.Using a web interface which is design in HTML & CSS. Same Principle apply on the Android App.
2. Data Storage
Data Storage is need because you can’t send command to device to Trigger ON or OFF the Light Bulb. But the device fetch read data There Some where to Store Data So Device Can Read.
3. Programming
In Programming we have to fetch data from server and then makes action according we want to operate.
4. Hardware Part
In Hardware we design Electronics Part Like PCB part, Power Supply etc.
Different Modes of Communication
- Server Mode or Standalone Mode
- Local Network or Offline Mode
- Client Mode or Online or Internet Based
- Using Own Customise Apps
- Using 3rd Party Apps
Working & Requirements of these Modes
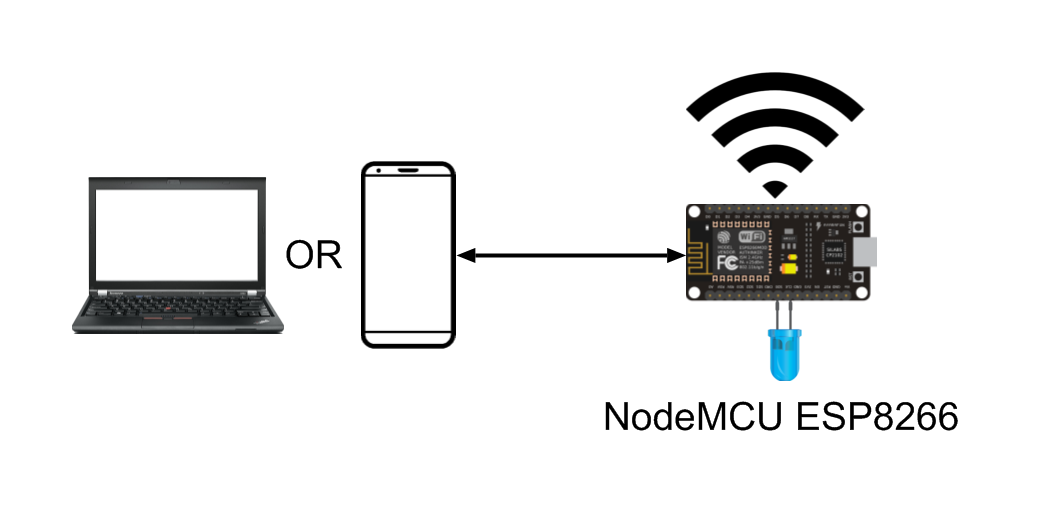
1. Server Mode or Standalone Mode
Requirement :
- Few 3mm Leds for Basic.
- Mobile or Laptop
In Server Mode or i Call (HotSpot Mode) there is no extra router switch or Internet requirement to operate its works as a Standalone Devices. Simply connect mobile or laptop to device WiFi name &Enter IP address that’s its. There is web interface to ON / OFF LEDs. But to Control this device you have stay within a Range of WiFi.
Working Diagram :
Code:
/*
Arduino Standalone Led AhirLabs.com
This Program is Works Standalone
by Connecting to Mobile to Device WiFi
Go to The Web Browser Enter 192.168.1.2 Ip in Address bar
There is Form By Click ON OFF BUTTON
By the response LED is also On & Off
*/
#include <ESP8266WiFi.h>
#include <WiFiClient.h>
#include <ESP8266WebServer.h>
IPAddress local_IP(192, 168, 1, 2);
IPAddress gateway(192, 168, 1, 1);
IPAddress subnet(255, 255, 255, 0);

#define WiFi_Name "HOME_IOT"
#define WiFi_Password "Password"
IPAddress ip;
// Variables
bool Light_Active = false;
int Led_bulb = 0;
// Led Blub
#define Led_1 D3

// To Active WiFi Server
ESP8266WebServer server(80); //Server on port 80

//Head of Html
const char MAIN_HEAD[] PROGMEM = R"=====(
<!DOCTYPE html>
<html>
<head>
<title>Arduino Led | AhirLabs.Com </title>
<meta name='viewport' content='width=device-width, initial-scale=1, shrink-to-fit=no'>
<style>
.ledon{
    width: 200px;
    height: 200px;
    background-color: deepskyblue;
    border-radius: 100%;
    border: 1px #36394c solid;
}
.ledoff{
    width: 200px;
    height: 200px;
    border-radius: 100%;
    background-color: #fff;
    border: 1px #36394c solid;
}
</style>
</head>
<body>
<center>
<h1>AhirLabs WiFi Light</h1>
)=====";
//body of Html
const char MAIN_BODY[] PROGMEM = R"=====(
</center>
</body>
</html>
)=====";

void handleRoot() {
String head = MAIN_HEAD;
String body = MAIN_BODY;
if (server.hasArg("light_1_val")) {
    Light_Active = (server.arg("light_1_val")=="1")?true:false;
  }

String content = "<form method='post' action='/'><p><input type='hidden' name='light_1_val' value='";
content += (Light_Active)?"0":"1";
content +="'/> </p> <p>Light One : </p><p><input type='submit' name='Light_1' class='";
content += (Light_Active)?"ledon":"ledoff";
content += "' value='";
content += (Light_Active)? "Click to Off Light":"Click to On Light";
content += "'/></p></form>";

String server_content = head+content+body;
 server.send(200, "text/html", server_content); //Send web page
}

void setup() {
  delay(5000);
  WiFi.mode(WIFI_OFF);
  delay(1000);
  WiFi.mode(WIFI_STA);
  delay(1000);
  pinMode(Led_1,OUTPUT);
  Serial.begin(9600);
  Serial.println("");
  Serial.println("");
  Serial.println(WiFi.softAPConfig(local_IP, gateway, subnet) ? "Ready" : "Failed!");
  Serial.println(WiFi.softAP(WiFi_Name, WiFi_Password) ? "Ready" : "Failed!");
  delay(100);

  //Onboard LED port Direction output
  //If connection successful show IP address in serial monitor
  Serial.println("");
  Serial.print("Connected to ");
  Serial.println(WiFi_Name);

  server.on("/", handleRoot);
  server.begin(); //Start server
  Serial.println("HTTP server started");
}

void loop(void){
  server.handleClient();          //Handle client requests
  if(Light_Active){
    digitalWrite(Led_1,HIGH);
  }else{
    digitalWrite(Led_1,LOW);

  }
  delay(10); // more Delay response to Light
}
2. Local Network or Offline Mode
Requirement :
- NodeMCU ESP8266
- Few 3mm Leds for Basic.
- Mobile or Laptop
- Local Php Server (File Based)
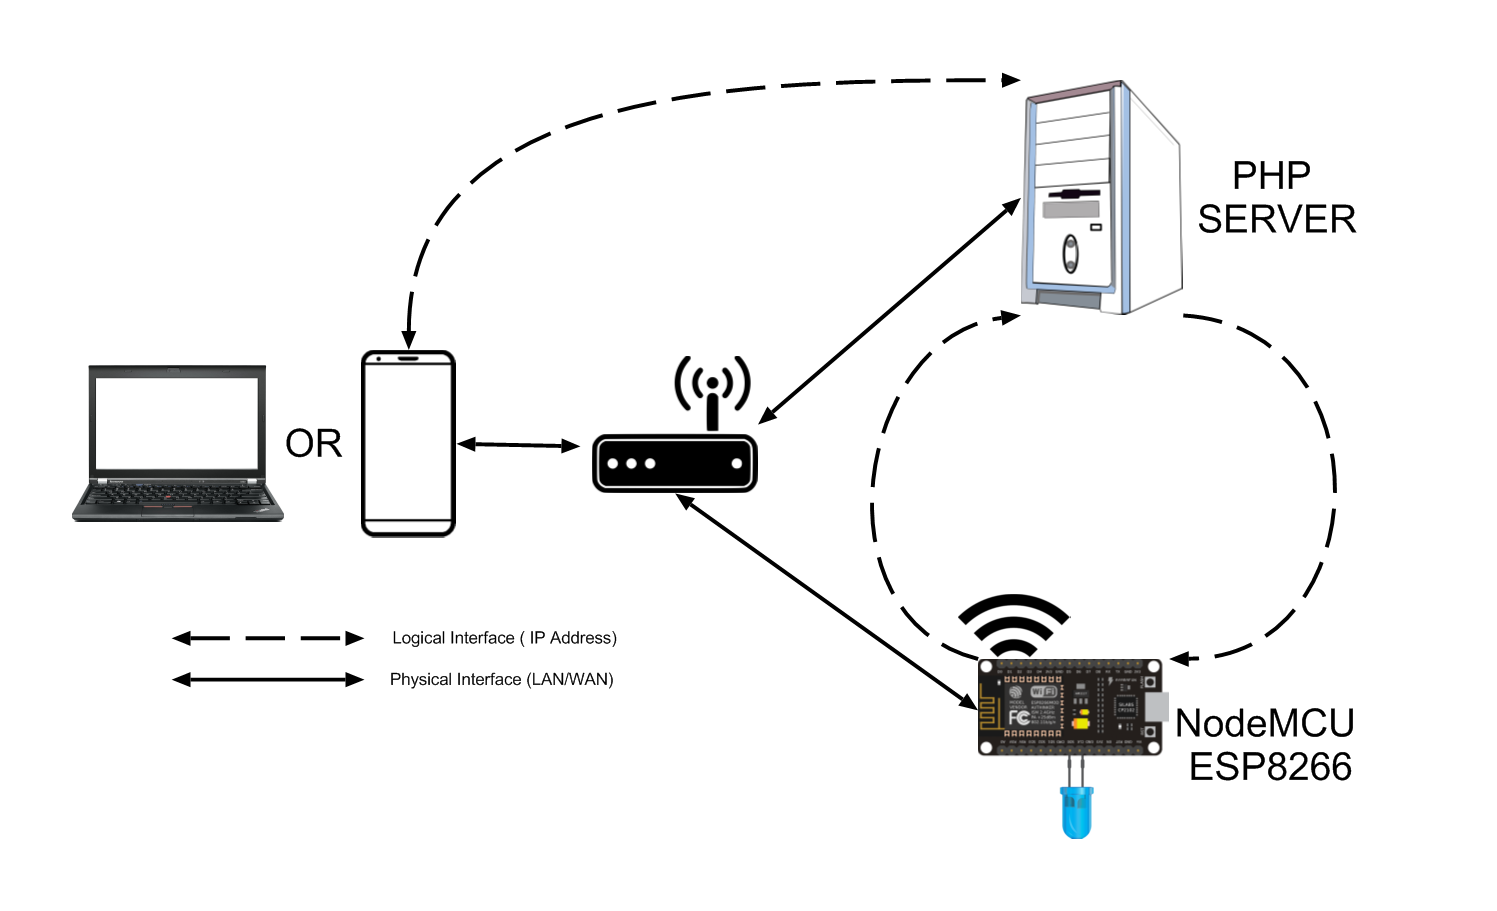
In this mode its works in Local Network without internet. But it need a Router and Php Server. First we make Interface in Php Server and file storage database. Connected to local WiFi Router set one reserve for this device.
Working Diagram
Code
SERVER CODE
- arduinoled.txt
Text File used for store value of led.
0
- arduino_json.php
Arduino Json is used for espnode fetching file its converts all data into json array.
$filename = "arduinoled.txt";
	$file = fopen($filename, "r");
	if ($file == false) {
		echo("Error in opening file");
	}
	$filetext = fread($file, filesize($filename));
	fclose($file);
	$array = array();
	if ($filetext == 1) {
		$led = "on";
		$array["led_1"] = "on";
	} else {
		$led = "off";
		$array["led_1"] = "off";
	}
echo json_encode($array);- index.php
Its is Web Link Interface to ON OFF Led on NODEMCU ESP 8266.
<?php
	if(isset($_POST["led1"])) {
		$led1 = $_POST["led1"];
		if ($led1 == 1) {
			$led1 = 0;
		} else {
			$led1 = 1;
		}
		$filename = "arduinoled.txt";
		$file = fopen($filename, "r");
		if ($file == false) {
			echo("Error in opening file");
		}
		fclose($file);
		$file = fopen($filename, "w");
		fwrite($file, $led1);
		fclose($file);
	}
	if (!isset($led1)) {
		$led1 = 0;
	}
?>
<!DOCTYPE >
<html>
	<title>Arduino Led | AhirLabs.Com </title>
	<meta name="viewport" content="width=device-width, initial-scale=1, shrink-to-fit=no">
	<head>
		<style>
			button.off {
				width: 200px;
				height: 200px;
				background-color: #b2acac;
				border: 0px;
				border-radius: 100%;
			}
			button.on {
				width: 200px;
				height: 200px;
				background-color: blue;
				border: 0px;
				border-radius: 100%;
			}
			body{
			   text-align:center;
			}
			p{
			               font-size: -webkit-xxx-large;
			}
		</style>
	</head>
	<body>
		<h1>NODE MCU </h1>
		<form method="post" >
			<p>
				<button type="submit" name="led1" class="<?php echo($led1 == 1) ? "on" : "off"; ?>" value="<?php echo($led1==1) ? $led1 : "0"; ?> ">

				</button></p>
				<p>Led is <?php echo($led1 != 1) ? "OFF" : "ON"; ?></p>
		</form>
	</body>
</html>
NodeMCU CODE
Code is Used for NODEMCU ESP8266.
#include <ESP8266WiFi.h>
#include <WiFiClient.h>
#include <ESP8266WebServer.h>
#include <ESP8266HTTPClient.h>
#include <ArduinoJson.h>

IPAddress static_ip(192, 168, 43, 10);
IPAddress gateway(192, 168, 43, 1);
IPAddress subnet(255, 255, 255, 0);

String Serverip = "http://192.168.43.243"; //Set Static IP for phpserver
#define WiFi_Name "SSID_name"
#define WiFi_Password "password"

void setup() {
  Serial.begin(115200);
  Serial.println();
  delay(5000);
  Serial.flush();
  WiFi.mode(WIFI_OFF);        //Prevents reconnection issue (taking too long to connect)
  delay(1000);
  WiFi.mode(WIFI_STA);        //This line hides the viewing of ESP as wifi hotspot
  delay(1000);
  WiFi.config(static_ip, gateway, subnet);
  WiFi.begin(WiFi_Name, WiFi_Password);     //Connect to your WiFi router
  Serial.println("");

  Serial.print("Connecting");
  // Wait for connection
  pinMode(D3, OUTPUT);
  digitalWrite(D3, LOW);
  while (WiFi.status() != WL_CONNECTED) {
    digitalWrite(D3, HIGH);
    delay(100);
    digitalWrite(D3, LOW);
    delay(100);
    Serial.print(".");
  }


}
void loop() {
  DynamicJsonDocument doc(500);
  if (WiFi.status() == WL_CONNECTED) {
    WiFiClient client;
    HTTPClient http;
    String Link = Serverip + "/arduino/arduino_json.php";
    String postData = "";
    int active_HTTP = http.begin(client, Link);
    http.addHeader("Content-Type", "application/x-www-form-urlencoded");
    int httpCode = http.POST(postData);
    String payload = http.getString();
    Serial.println(payload);
    if (httpCode > 0) {
      if (httpCode == HTTP_CODE_OK || httpCode == HTTP_CODE_MOVED_PERMANENTLY) {
        DeserializationError error = deserializeJson(doc, payload);
        // Test if parsing succeeds.
        if (error) {
          Serial.print(F("deserializeJson() failed: "));
          Serial.println(error.c_str());
          return;
        }
      }
    } else {
      Serial.printf("[HTTP] GET... failed, error: %s\n", http.errorToString(httpCode).c_str());
    }
    http.end();
  }
  const char* led1 = doc["led_1"];

  Serial.print("Led 1 : ");
  Serial.print(led1);

  if (String(led1) == "on") {
    digitalWrite(D3, HIGH);
  } else {
    digitalWrite(D3, LOW);
  }
  Serial.println();
  delay(500);
}
Problems or Issue During Programming
1. Network Issue
Solution check ip address make it static address as possible.
2. Json Decoding
Solution make sure only json array is came alone not extra data is came in arduino_json.php
3. Client Mode
In Client mode we Need Local router for communication.
Types of Client Mode
3.1 : Custom Apps.
3.2 : 3rd Party Apps
I. Custom Apps Using Php
Requirement :
- Internet Router
- Live PHP Server
- NodeMCU ESP8266
- Few 3mm Leds for Basic.
- Mobile or Laptop
- DataBase Use MySql & FireBase (I use MySql )
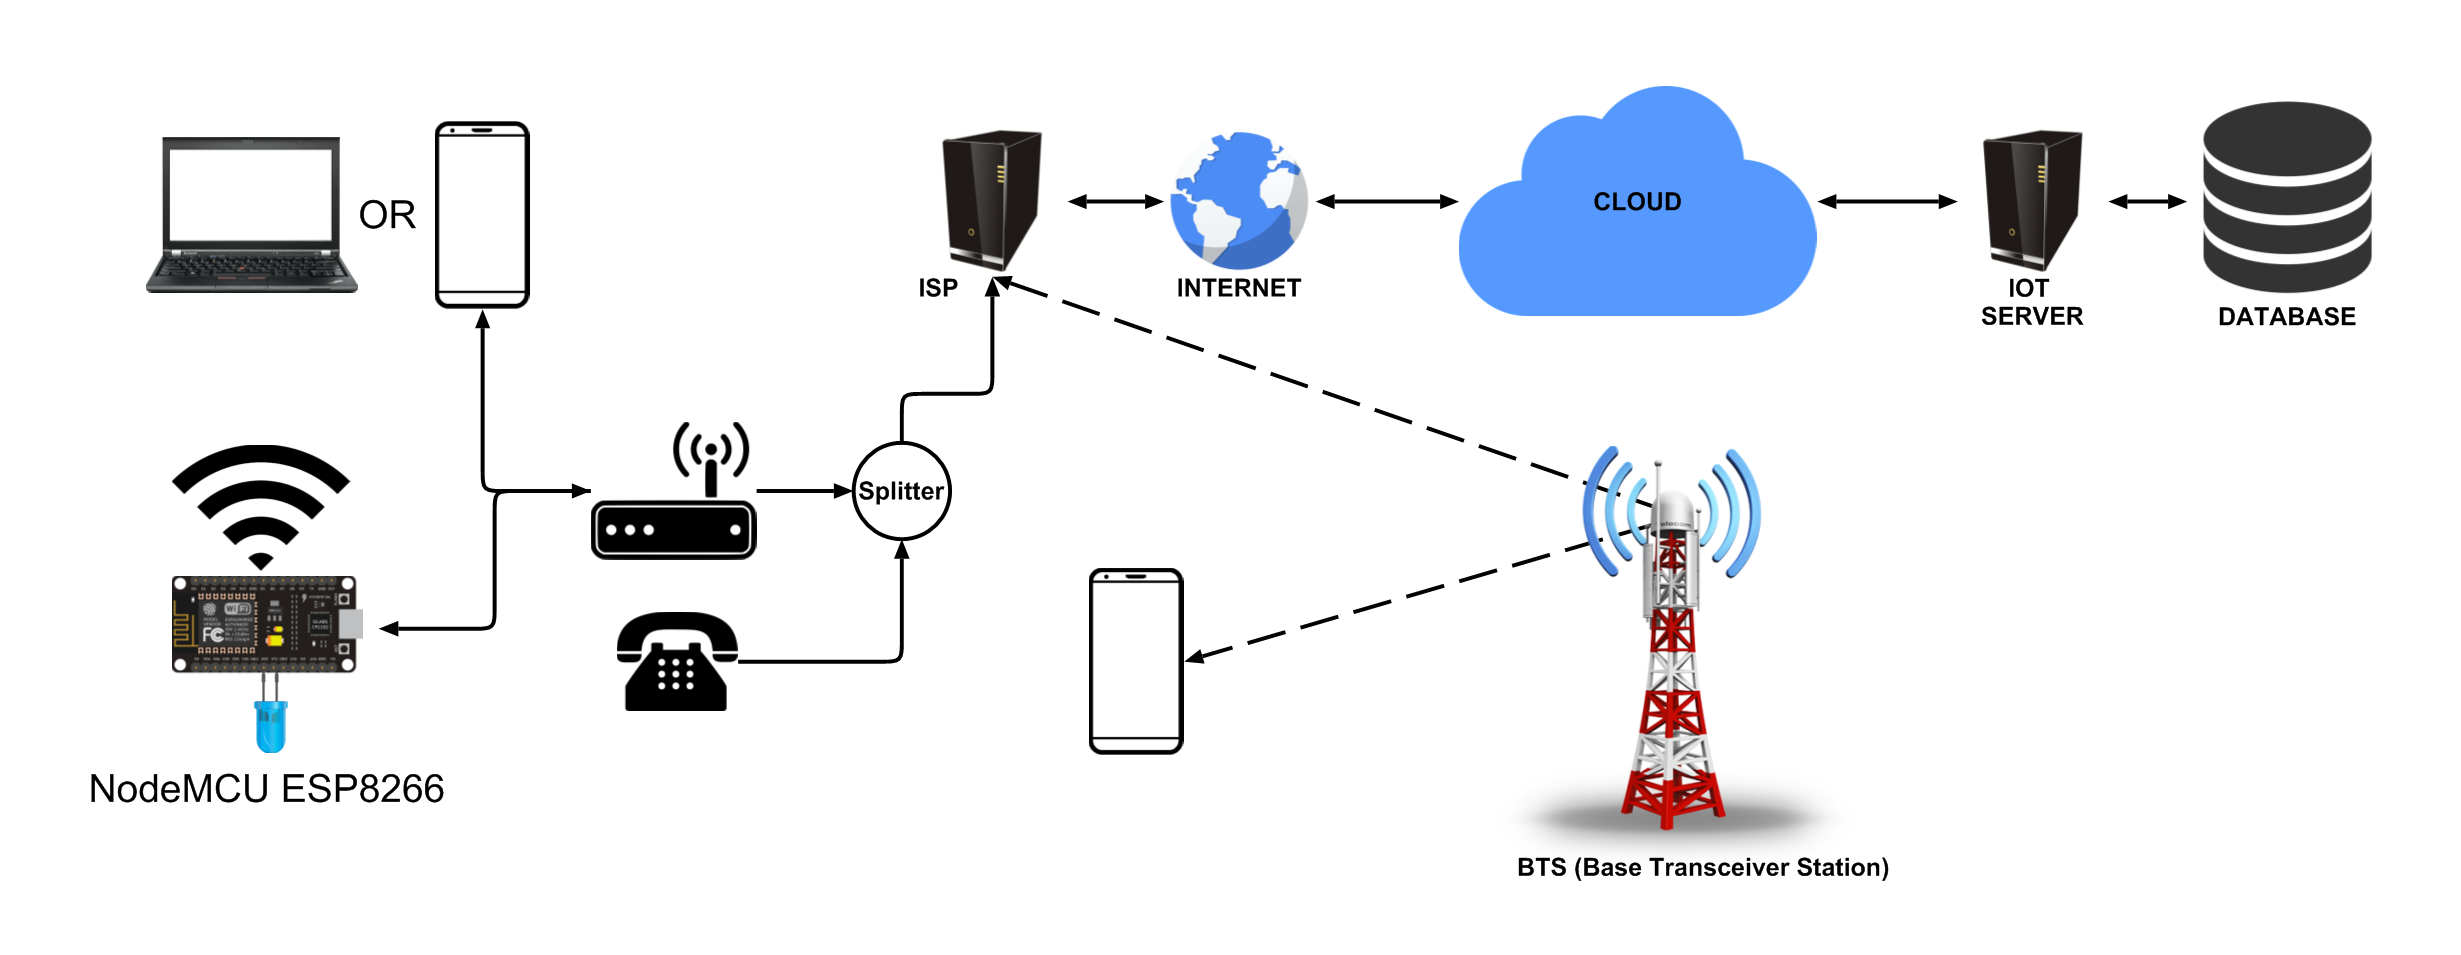
Its works only when internet connection is alive.when is internet goes offline there is no control on Devices so Internet Must Active 24hr/365days.
In this case we access anywhere using internet. Im Test this on local network or Live Server Some changes required. If understand properly then you able to change code according to the usage.
Working Diagram
SERVER CODE
- database.php
<?php
   //* DATABASE CONFIGURATION */
   define('DB_SERVER', 'localhost');
   define('DB_USERNAME', 'IOT');
   define('DB_PASSWORD', 'ILoveIndia');
   define('DB_DATABASE', 'arduino_iot');
   define("BASE_URL", "http://demo.ahirlabs.com/arduino/");
   // Eg. http://yourwebsite.com
   function dbconnection() {
      $dbhost = DB_SERVER;
      $dbuser = DB_USERNAME;
      $dbpass = DB_PASSWORD;
      $dbname = DB_DATABASE;
      try {
         $dbConnection = new PDO("mysql:host=$dbhost;dbname=$dbname", $dbuser, $dbpass);
         $dbConnection -> exec("set names utf8");
         $dbConnection -> setAttribute(PDO::ATTR_ERRMODE, PDO::ERRMODE_EXCEPTION);
         return $dbConnection;
      } catch (PDOException $e) {
         return false;
         //echo 'Connection failed: ' . $e -> getMessage();
      }
   }
?>
Database File : arduino_iot.php
-- phpMyAdmin SQL Dump
-- version 4.8.3
-- https://www.phpmyadmin.net/
--
-- Host: localhost
-- Generation Time: Nov 04, 2019 at 12:08 PM
-- Server version: 10.1.37-MariaDB
-- PHP Version: 7.2.12

SET SQL_MODE = "NO_AUTO_VALUE_ON_ZERO";
SET AUTOCOMMIT = 0;
START TRANSACTION;
SET time_zone = "+00:00";


/*!40101 SET @OLD_CHARACTER_SET_CLIENT=@@CHARACTER_SET_CLIENT */;
/*!40101 SET @OLD_CHARACTER_SET_RESULTS=@@CHARACTER_SET_RESULTS */;
/*!40101 SET @OLD_COLLATION_CONNECTION=@@COLLATION_CONNECTION */;
/*!40101 SET NAMES utf8mb4 */;

--
-- Database: `php_arduino`
--

-- --------------------------------------------------------

--
-- Table structure for table `arduino_led`
--

CREATE TABLE `arduino_led` (
  `id` int(11) NOT NULL,
  `led_name` varchar(255) NOT NULL,
  `led_value` int(11) NOT NULL,
  `user_id` int(11) NOT NULL
) ENGINE=InnoDB DEFAULT CHARSET=latin1;

--
-- Dumping data for table `arduino_led`
--

INSERT INTO `arduino_led` (`id`, `led_name`, `led_value`, `user_id`) VALUES
(1, 'led_1', 0, 1);

-- --------------------------------------------------------

--
-- Table structure for table `user_id`
--

CREATE TABLE `user_id` (
  `id` int(11) NOT NULL,
  `api_auth` varchar(255) NOT NULL,
  `api_key` varchar(255) NOT NULL,
  `api_username` varchar(255) NOT NULL
) ENGINE=InnoDB DEFAULT CHARSET=latin1;

--
-- Dumping data for table `user_id`
--

INSERT INTO `user_id` (`id`, `api_auth`, `api_key`, `api_username`) VALUES
(1, 'eddc57dc200182ae5cbe7f84e3624803', '97d141892f1461125f47354954b06e65', 'ahirlabs');

--
-- Indexes for dumped tables
--

--
-- Indexes for table `arduino_led`
--
ALTER TABLE `arduino_led`
  ADD PRIMARY KEY (`id`);

--
-- Indexes for table `user_id`
--
ALTER TABLE `user_id`
  ADD PRIMARY KEY (`id`);

--
-- AUTO_INCREMENT for dumped tables
--

--
-- AUTO_INCREMENT for table `arduino_led`
--
ALTER TABLE `arduino_led`
  MODIFY `id` int(11) NOT NULL AUTO_INCREMENT, AUTO_INCREMENT=2;

--
-- AUTO_INCREMENT for table `user_id`
--
ALTER TABLE `user_id`
  MODIFY `id` int(11) NOT NULL AUTO_INCREMENT, AUTO_INCREMENT=2;
COMMIT;

/*!40101 SET CHARACTER_SET_CLIENT=@OLD_CHARACTER_SET_CLIENT */;
/*!40101 SET CHARACTER_SET_RESULTS=@OLD_CHARACTER_SET_RESULTS */;
/*!40101 SET COLLATION_CONNECTION=@OLD_COLLATION_CONNECTION */;
- userClass.php
<?php
   /*** UserClass ***/
   class userclass {
      public function check_device($api_key = "", $api_auth = "",$username = "") {
         try {
            $db = dbconnection();
            $stmt = $db->prepare("SELECT * FROM user_id WHERE api_auth=:api_auth AND api_key=:api_key AND api_username=:api_username");
            $stmt->bindParam("api_auth", $api_auth, PDO::PARAM_STR);
            $stmt->bindParam("api_key", $api_key, PDO::PARAM_STR);
            $stmt->bindParam("api_username", $username, PDO::PARAM_STR);
            $stmt->execute();
            $data = $stmt->fetch(PDO::FETCH_OBJ);
            return $data;
         } catch(PDOException $e) {
            echo '{"error":{"text":'.$e->getMessage().'}}';
            //return FALSE;
         }
      }
      public function on_off($device_id = "") {
         try {
            $db = dbconnection();
            $stmt = $db->prepare("SELECT * FROM arduino_led WHERE user_id = :device_id ");
            $stmt->bindParam("device_id", $device_id, PDO::PARAM_STR);
            $stmt->execute();
            $data = $stmt->fetch(PDO::FETCH_OBJ);
            return $data;
         } catch(PDOException $e) {
            echo '1 :{"error":{"text":'.$e->getMessage().'}}';
            //return FALSE;
         }
      }
      public function on_off_value($led_name="",$user_id) {
         try {
            $db = dbconnection();

            $stmt = $db->prepare("SELECT * FROM arduino_led WHERE led_name = :led_name AND user_id = :user_id ");
            $stmt->bindParam("led_name", $led_name, PDO::PARAM_STR);
            $stmt->bindParam("user_id", $user_id, PDO::PARAM_INT);
            $stmt->execute();
            $data = $stmt->fetch(PDO::FETCH_OBJ);
            return $data;
         } catch(PDOException $e) {
            echo '2: {"error":{"text":'.$e->getMessage().'}}';
            //return FALSE;
         }
     }

      public function on_off_led($led_name="",$user_id,$led_value) {
         try{
            $db = dbconnection();
            $stmt = $db->prepare("SELECT * FROM arduino_led WHERE led_name = :led_name AND user_id = :user_id ");
            $stmt->bindParam("led_name", $led_name, PDO::PARAM_STR);
            $stmt->bindParam("user_id", $user_id, PDO::PARAM_STR);
            $stmt->execute();
            $data = $stmt->fetch(PDO::FETCH_OBJ);
            $led_id = $data->id;
           $stmt ="";
            $sql="UPDATE arduino_led SET led_value = :led_value WHERE id =:led_id";
            $st = $db->prepare($sql);
            $st->bindParam("led_value", $led_value, PDO::PARAM_STR);
            $st->bindParam("led_id", $led_id, PDO::PARAM_INT);
            return $st->execute();
             //TRUE;
            //echo "ok";
            //$data = $stmt->fetch(PDO::FETCH_OBJ);
         } catch(PDOException $e) {
            echo '2: {"error":{"text":'.$e->getMessage().'}}';
            //return FALSE;
         }

      }
   }
   //echo "userclass";
?>- arduino_json.php
<?php
   include 'database.php';
   include 'userClass.php';
   $lights_array = array();
   if (isset($_REQUEST["api_key"]) && isset($_REQUEST["api_auth"]) && isset($_REQUEST["username"])) {
      $api_key = $_REQUEST["api_key"];
      $api_auth = $_REQUEST["api_auth"];
      $username = $_REQUEST["username"];
      $userclass = new userclass();
      $device = $userclass->check_device($api_key, $api_auth, $username);
      $lights_array = $userclass->on_off($device->id);
      $array = array();
      for ($i = 0; $i < count((array)$lights_array->id); $i++) {
         $name = $lights_array->led_name;
         $value = $lights_array->led_value;
         $array[$name] = ($value == "1") ? "on" : "off";
      }
       echo json_encode($array);
}- index.php
<?php
   require_once('database.php');
	require_once('userClass.php');
   $userclass = new userclass();

	if (isset($_POST["led1"])) {
		$led1 = $_POST["led1"];
      if($led1==1){
         $led1=0;
      }else{
         $led1=1;
      }
      $done = $userclass->on_off_led("led_1","1","$led1");

	}else{
	     $obj = $userclass->on_off_value("led_1",1);
        $led1 = $obj->led_value;
   }

?>
<!DOCTYPE >
<html>
   <title>Arduino Led | AhirLabs.Com </title>
   <meta name="viewport" content="width=device-width, initial-scale=1, shrink-to-fit=no">
   <head>
      <style>
			button.off {
				width: 200px;
				height: 200px;
				background-color: #b2acac;
				border: 0px;
				border-radius: 100%;
			}
			button.on {
				width: 200px;
				height: 200px;
				background-color: blue;
				border: 0px;
				border-radius: 100%;
			}
			body {
				text-align: center;
			}
			p {
				font-size: -webkit-xxx-large;
			}
      </style>
   </head>
   <body>
      <h1>NODE MCU </h1>
      <form method="post" >
         <p>
            <button type="submit" name="led1" class="<?php echo($led1 == 1) ? "on" : "off"; ?>" value="<?php echo($led1 == 1) ? "1" : "0"; ?> ">
            </button></p>
            <p>Led is <?php echo($led1 != 1) ? "OFF" : "ON"; ?></p>
      </form>
   </body>
</html>
NodeMCU CODE
Code is Used for NODEMCU ESP8266.
#include <ESP8266WiFi.h>
#include <WiFiClient.h>
#include <ESP8266WebServer.h>
#include <ESP8266HTTPClient.h>

#include <ArduinoJson.h>

IPAddress static_ip(192, 168, 43, 10);
IPAddress gateway(192, 168, 43, 1);
IPAddress subnet(255, 255, 255, 0);

String API_AUTH = "eddc57dc200182ae5cbe7f84e3624803";
String API_KEY = "97d141892f1461125f47354954b06e65";
String API_USERNAME = "ahirlabs";
String Serverip = "www.domain.com"; // if you have own server
String Serverip = "http://192.168.43.243";
#define WiFi_Name "AhirLabs.com"
#define WiFi_Password "zero122333444455555"

void setup() {
  Serial.begin(115200);
  Serial.println();
  delay(5000);
  Serial.flush();
  WiFi.mode(WIFI_OFF);        //Prevents reconnection issue (taking too long to connect)
  delay(1000);
  WiFi.mode(WIFI_STA);        //This line hides the viewing of ESP as wifi hotspot
  delay(1000);
  WiFi.config(static_ip, gateway, subnet);
  WiFi.begin(WiFi_Name, WiFi_Password);     //Connect to your WiFi router
  Serial.println("");

  Serial.print("Connecting");
  // Wait for connection
  pinMode(D3, OUTPUT);
  digitalWrite(D3, LOW);
  while (WiFi.status() != WL_CONNECTED) {
    digitalWrite(D3, HIGH);
    delay(100);
    digitalWrite(D3, LOW);
    delay(100);
    Serial.print(".");
  }


}
void loop() {
  DynamicJsonDocument doc(500);
  if (WiFi.status() == WL_CONNECTED) {
    WiFiClient client;
    HTTPClient http;
    String Link = Serverip + "/arduino/arduino_json.php";
    String postData = "username=" + API_USERNAME + "&api_key=" + API_KEY + "&api_auth=" + API_AUTH;
    int active_HTTP = http.begin(client, Link);
    http.addHeader("Content-Type", "application/x-www-form-urlencoded");
    int httpCode = http.POST(postData);
    //int httpCode = http.GET();
    String payload = http.getString();
    Serial.println(payload);
    if (httpCode > 0) {
      if (httpCode == HTTP_CODE_OK || httpCode == HTTP_CODE_MOVED_PERMANENTLY) {
        DeserializationError error = deserializeJson(doc, payload);
        // Test if parsing succeeds.
        if (error) {
          Serial.print(F("deserializeJson() failed: "));
          Serial.println(error.c_str());
          return;
        }
      }
    } else {
      Serial.printf("[HTTP] GET... failed, error: %s\n", http.errorToString(httpCode).c_str());
    }
    http.end();
  }
  const char* led1 = doc["led_1"];

  Serial.print("Led 1 : ");
  Serial.print(led1);

  if (String(led1) == "on") {
    digitalWrite(D3, HIGH);
  } else {
    digitalWrite(D3, LOW);
  }
  Serial.println();
  delay(500);
}
II. Custom Apps Using 3rd Party Apps
Its works only when internet connection is alive. when is internet goes offline there is no control on Devices so Internet Must Active 24hr/365days.
The Second thing we have to register 3rd party apps Like Blynk, Cayenne, Thingsboard, OpenHAB or Any other IOT platform which provide IOT for device NODEMCU 8266.
Thanks for Supporting I Wish You Like It,Please Comment Down For Other Information About NodeMCU ESP8266.
Very good job
Can we get ready made solutions for industry IIOT
Sorry we Not Make solutions for industry IOT.
We make Only Small Projects for Diploma or BTech Students
Your means of describing everything in this post is genuinely fastidious, all can simply understand it, Thanks a lot.
Thanks, +
very good
interesting post
test
handwritten by the author.
inventions of typography
+ for the post
One of the most skilled calligraphers
so expensive material
consists of the book itself
handwritten by the author.